
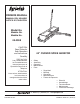
Installation Guide


5
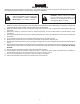
ASSEMBLY INSTRUCTIONS
TOOLS REQUIRED FOR ASSEMBLY
(2) 1/2"wrenches
(1) 9/16"wrenches
(1)3/4"wrenchoradjustablewrench
(1) Pliers
Beforeassemblingtheaerator,layoutallofthepartsand
hardwareasshownonthepreviouspages.
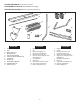
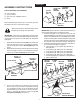
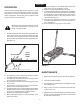
FIGURE 1 FRONT VIEW
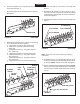
FIGURE 2 REAR VIEW
IMPORTANT:Thepointsofthespikedisksmustbeturned
inthedirectionshownintheassemblydrawings.Theaerator
willnotperformproperlyifthespikedisksareassembled
backwards.
(D) 5/16" x 1"
HEX BOLT
(G) 5/16" NYLOCK NUT
(D) 5/16" x 1"
HEX BOLT
(P) LIFT PLATE
AXLE
SUPPORT
BRACKET
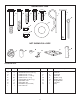
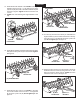
FIGURE 3 REAR VIEW
IMPORTANT:Besuretherearofthetrayfacestowardyou
andthespikediskspointinthedirectionshown.
4. Pivottheendplateonyourrightdownoutoftheway.
Placethelongendoftheaxleintotheotherpivotplate.
(Measurefromtheblindholeinthemiddleoftheaxle.If
therearetwoblindholes,usetheholethatisinalignment
withtheendholes.)Fitthemiddleholeintheaxledown
ontothetabontheaxlesupportbracket.Seegure3.
5. Assemblethefollowingpartsinsequenceontotheshort
endoftheaxle(asshowningure3):
a. Aatwasher(H),shortspacer(N),diskhub(L)
and spike disk
b. Alongspacer(M),diskhub(L)andspikedisk.
c. Alongspacer(M),diskhub(L)andspikedisk.
d. Alongspacer(M),diskhub(L)andspikedisk.
e. Alongspacer(M),diskhub(L)andspikedisk.
f. Twoshortspacers(N),adiskhub(L)andspikedisk.
g. Ashortspacer(Q).
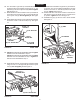
Spikepointsaresharp.Exercisecautionwhen
handlingandworkingnearspikedisks.
HITCH ARM
MOUNT
BRACKET
(G) 5/16"
NYLOCK
NUT
(D) 5/16" x 1"
HEX BOLT
(O) ANGLE
BRACKET
REAR OF TRAY
REAR OF TRAY
(N) SHORT
SPACER
(M) LONG
SPACER
(L) DISK
HUB
(H) FLAT
WASHER
SHORT END
LONG END
TAB ON AXLE
SUPPORT BRACKET
HOLE
(N) SHORT
SPACER
1. Assembletheendplatestotheinsideslotsateachend
ofthetrayusingtwo5/16"x1"hexbolts(D)and5/16"
nylock nuts (G) per end plate. Do not tighten yet. See
gure1.
2. Assembletheliftplate(S)andtheaxlesupportbracket
tothetrayusingfour5/16"x1"hexbolts(D)and5/16"
nylock nuts (G). Do not tighten yet.Seegure1.
3. Turnthetrayupsidedownasshowningure2sothat
therearofthetray(fourholesinthebottom)isfacing
you.Assembletwohitcharmmountbracketsandtwo
anglebrackets(O)tothebottomofthetrayusingfour
5/16"x1"hexbolts(D)and5/16"nylocknuts(G).Do
not tighten completely.Seegure2.
ENGLISH