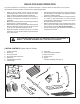
™ OWNERS MANUAL Model No. 45-03641 45-03642 250 LB. TOW BROADCAST SPREADER CAUTION: Read Rules for Safe Operation and Instructions Carefully • • • • • Safety Assembly Operation Maintenance Parts the fastest way to purchase parts www.speedepart.com PRINTED IN USA FORM NO. 49857 rev.
RULES FOR SAFE OPERATION Any power equipment can cause injury if operated improperly or if the user does not understand how to operate the equipment. Exercise caution at all times when operating equipment. • • • • • Read the towing vehicle owners manual and towing vehicle safety rules. Know how to operate your tractor before using the broadcast spreader attachment. Read the chemical label instructions and cautions for handling and applying the chemicals purchased for spreading.
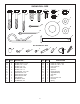
SHOWN FULL SIZE I G A B C D F E H J L M K N O P NOT SHOWN FULL SIZE Q KEY A B C D E F G H I J K L R S QTY. DESCRIPTION 4 5 1 2 2 1 8 4 2 4 7 4 V T Hex Bolt, 5/16" x 1-3/4" Hex Bolt, 1/4" x 1-3/4" Hex Bolt, 1/4" x 2" Hex Bolt, 3/8" x 3/4" Hex Bolt, 1/4" x 1" Carriage Bolt, 1/4" x 3/4" Nylock Hex Nut, 1/4" Nylock Hex Nut, 5/16" Nylock Hex Nut, 3/8" Nylon Washer Flat Washer, 5/16" Flat Washers, 3/4" 3 KEY QTY.
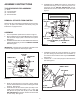
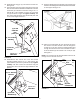
ASSEMBLY INSTRUCTIONS 6. Assemble the two outer hitch braces on each side to the hitch tube using a 1/4" x 2" hex bolt (C) and a 1/4" nylock hex nut (G). DO NOT TIGHTEN YET. Do not assemble the two inner hitch braces at this time. See figure 2. TOOLS REQUIRED FOR ASSEMBLY (1) (2) (2) (2) Pliers 7/16" Wrenches 1/2" Wrenches 9/16" Wrenches STACK HITCH BRACES AS SHOWN (C) 1/4" x 2" HEX BOLT REMOVAL OF PARTS FROM CARTON HITCH TUBE Remove all parts and hardware packages from the carton.
15. Assemble the two inner hitch braces to the flow control mounting tube using a 1/4" x 1-3/4" hex bolt (B) and a 1/4" nylock hex nut (G). DO NOT TIGHTEN YET. See figure 6. 16. Tighten all nuts and bolts assembled up to this point. Do not collapse the tubes when tightening. 9. Assemble a spacer (Q), a 3/4" flat washer (L), a wheel (air valve facing out) and another 3/4" flat washer (L) onto the end of the axle that has both the large and small holes. See figure 4. 10.
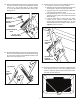
18. Assemble the vinyl grip (U) onto the flow control arm. See figure 8. 19. Insert the flow control arm down through the slot in the flow control bracket. Assemble the small hole of the flow control link (V) to the flow control arm using a 1/4" x 1" hex bolt (E), a nylon washer (J) and a 1/4" nylock hex nut (G) as shown in figure 8. Tighten carefully. The flow control link should be snug but should pivot with no more than slight resistance. 21.
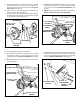
23. Place the adjustable stop (S) into the "ON" end of the slot in the top of the flow control mounting bracket. Secure with the 1/4" x 3/4" carriage bolt (F), a nylon washer (J), a 5/16" flat washer (K) and the nylon wing nut (R). See figure 12. (R) NYLON WING NUT OF F (K) 5/16" FLAT WASHER (J) NYLON WASHER 25. Position the flow control mounting bracket (figure 14). a. Push flow control arm to "OFF" position. b.
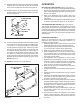
OPERATION 27. Assemble the hitch bracket to the hitch extension bracket using two 3/8" x 3/4" hex bolts (D) and 3/8" nylock hex nuts (I). Insert the bolts from the bottom. See figure 16. SETTING THE FLOW CONTROL (figure 14 on page 7.) 1. Loosen the nylon wing nut, set the adjustable stop to the desired flow rate setting and retighten the wing nut. The higher the setting number, the wider the opening in the bottom of the hopper. 2.
CHECK TIRE INFLATION 3. Check if tires are adequately inflated before each use. Do not inflate beyond maximum recommended pressure. REFER TO CHARTS CAUTION: DO NOT inflate tires beyond the maximum recommended pressure printed on side of tire. CLEANING 4. Rinse inside of hopper and exterior of spreader and dry off before storing. OVERLAP LUBRICATE (See figure 19) 5. Lightly apply automotive grease as needed to the sprocket and gear. 6.
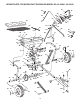
REPAIR PARTS FOR BROADCAST SPREADER MODEL NO.
REPAIR PARTS FOR BROADCAST SPREADER MODEL NO. 45-03641, 45-03642 REF. NO. 1 2 3 4 5 6 7 8 9 10 11 12 13 14 15 16 17 18 19 20 21 22 23 24 25 26 27 28 29 30 31 32 33 34 PART NO. QTY.
the fastest way to purchase parts www.speedepart.com © 2005 Agri-Fab, Inc. REPAIR PARTS Agri-Fab, Inc. 809 South Hamilton Sullivan, IL. 61951 217-728-8388 www.agri-fab.