
Owner`s manual


.
.
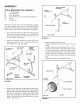
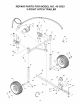
Install the hitch anchors onto the ends of the
trailer frame. The clevis pin hole should be to the
inside. Secure with four 3/8" x 2-1/2" hex bolts and
3/8" Nylock hex nuts. Tighten the nuts only until
they are just snug. Slide each hitch anchor along
the frame to align with the outer hole for category
1 implements or the inner hole are for category 0
implements. Secure each hitch anchor with a clevis
pin and haircotter pin. See figure 4.
Install a quick attach pin in the slot of each hitch
anchor. Secure with a haircotter pin. See figure 4.
HITCH QUICK ATTACH PIN
ANCHOBB_Z
CLEVIS PIN
3/8" x 2- _/
HEX BOLTS
HAIBCOTTER
PINS
318" NYLOCK
HEX NUTS
FIGURE4
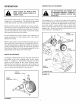
7. Position the winch on the hitch trailer so that the
tension plate is on the back of the winch and the
wire rope feeds out from the bottom of the drum at
the front. Secure the winch to the trailer using two
5/16" x 1" hex bolts and 5/16" lock washers. See
figure 5.
TENSION
PLATE AT REAR
5116" x 1" HEX BOLT
5/16" LOCK WASHER
;/
ALTERNATE
MODELS
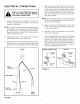
_ WHEN OPERATING THE WINCH OR
HANDLINGTHEWIRE ROPE, FOLLOWALL
INSTRUCTIONS AND SAFETY RELATED
INFORMATION AS DETAILED IN THE
MANUALS INCLUDED WITH THEWINCH.
.
.
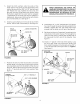
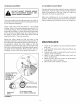
10.
Install three 1/4" x 1-3/4" hex bolts and 1/4" Nylock
hex nuts through the pulley bracket welded to the
drawbar. Tighten the nuts, but leave them loose
enough that the bolts can still spin. See figure 6.
Set the winch drum to "freewheel" according to the
instructions in the winch manual. Pull enough wire
rope from the drum to extend the hooked end of
the rope past the hitch end of the drawbar. See
figure 6.
Install a 1" spacer in the hub of the pulley. Loop
the wire rope under and around the pulley and
then install the pulley in the bracket using a 3/8" x
1-3/4" hex bolt and a 3/8" Nylock hex nut. Tighten.
See figure 6.
HOOK END
OF WIRE ROPE PULLEY
318" NYLOCK
HEX NUT
1"SPACER
/o
/
-'/"_1/4"
NYLOCK
HEX NUT
FIGURE 6
FIGURE 5