™ OWNERS MANUAL MANUAL DEL USUARIO NOTICE D’UTILISATION Model No. Modelo No. Modèle No. 45-0345 PUSH/TOW CONVERTIBLE POLY DUMP CART CARRETILLA CONVERTIBLE DE VOLTEO DE EMPUJE Y REMOLQUE, DE POLY CAUTION: Read Rules for Safe Operation and Instructions Carefully PRECAUCION: Lea cuidadosamente los Procedimientos e Instrucciones para la Operación Segura de la Máquina. ATTENTION: Lire et suivre attentivement les instructions et consignes de sécurité de cette notice.
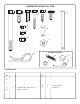
CARTON CONTENTS (Loose Parts in Carton) CONTENIDO DE LA CAJA (Partes Sueltas en la Caja) CONTENU DU CARTON (Pièces en Vrac Dans le Carton) 2 1 11 12 5 13 6 3 9 8 4 7 ESPAÑOL ENGLISH 1. 2. 3. 4. 5. 6. 7. 8. 9. 10. 11. 12. 13. Poly Tray Handle Tube Front Tongue Rear Tongue Latch Stand Plate Latch Stand Bracket Hitch Bracket Leg Stand Bracket Latch Lock Latch Mount Brackets (2) Wheel Support Axle Wheels (2) 10 1. 2. 3. 4. 5. 6. 7. 8. 9. 10. 11. 12. 13.
HARDWARE SHOWN FULL SIZE A C B F E D G K H L M J Not Shown Full Size N O R Q HARDWARE PACK Ref. No. Quant. A B C D E F G H J 1 2 2 6 3 8 1 1 6 Description Ref. No. K L M N O P Q R Hex Bolt, 3/8" x 4" Hex Bolt, 3/8" x 1" Hex Bolt, 5/16" x 1" Hex Bolt, 1/4" x 1-3/4" Hex Bolt, 1/4" x 1" Truss Head Bolt, 5/16" x 3/4" Lg. Clevis Pin, 3/8" x 4" Clevis Pin, 3/8" x 1" Flat Washer, 1/4" 3 Quant.
ENGLISH SAFETY RULES Remember, any power equipment can cause injury if operated improperly or if the user does not understand how to operate the equipment. Exercise caution at all times when using power equipment. Caution: Vehicle braking and stability may be affected with the addition of an accessory or an attachment. Be aware of changing conditions on slopes. Look for this symbol to point out important safety precautions. It means – attention! Become alert! Your safety is involved. 1. 2. 3. 4. 5. 6.
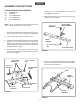
ENGLISH ASSEMBLY INSTRUCTIONS TOOLS REQUIRED FOR ASSEMBLY (1) Screwdriver (1) Hammer (2) 7/16" Wrenches (2) 1/2" Wrenches (2) 9/16" Wrenches 5. Assemble the latch lock subassembly to the rear tongue using two 1/4" x 1" hex bolts (E) and 1/4" nylock nuts (K). Tighten. See figure 2. 6. Assemble the plastic cap (P) to the front end of the rear tongue as shown in figure 2. NOTE: All 1/4" flat washers should be assembled so that they rest directly against the poly tray surface.
ENGLISH 8. Assemble the hitch bracket to the front tongue using two 3/8" x 1" hex bolts (B) and 3/8" nylock nuts (M). Tighten. See figure 4. 12. Assemble a wheel with the valve stem facing out onto the axle. Assemble a hub cap (Q) by pressing or tapping it onto the axle. Repeat on other end of axle. See figure 6. 9. Assemble the leg stand bracket to the front tongue using two 5/16" x 1" hex bolts (C) and 5/16" nylock nuts (L). Tighten. See figure 4.
ENGLISH CART WITH TONGUE ARRANGED FOR TOWING 15. Insert two 1/4" x 1-3/4" hex bolts (D) through the handle tube as shown in figure 8. Holding the bolts in place in the handle, insert the bolts through the holes in the poly tray, allowing the legs of the handle to slip beneath the latch stand bracket. Secure the two bolts with two 1/4" flat washers (J) and 1/4" nylock nuts (K). Do not tighten yet. See figure 8.
ENGLISH OPERATION PUSH CART IMPORTANT: Leave the latch lock clevis pin in place at all times while using the cart as a push cart. The clevis pin is shown in figure 1 on page 5. CAUTION: TO AVOID POSSIBLE INJURY, BEFORE RELEASING THE LATCH BE SURE THAT NO ONE IS NEAR THE CART. 1. To convert the cart for push operation, remove the 4" long clevis pin and hair cotter pin which secure the tongue in the towing position. (See figure 10 on page 7.
(Keep this sheet in a safe place for future reference.) Use this guide to determine if a slope is safe for the operation of your tractor and cart. Refer also to the instructions in your vehicle owners manual. SLOPE GUIDE SIGHT AND HOLD THIS LEVEL WITH A VERTICAL TREE A POWER POLE A CORNER OF A BUILDING OR A FENCE POST FOL D A L O NG DO TTED L IN E , R E PRESE NTING A 1 0 D EGREE SLOPE CAUTION: DO NOT OPERATEYOUR TRACTOR AND CART ON A SLOPE IN EXCESS OF 10 DEGREES.
ESPAÑOL NORMAS DE SEGURIDAD Cualquier equipo movido por motor puede causar lesiones si se opera inadecuadamente o si el usuario no entiende cómo debe operarlo. Manténgase atento y cauteloso siempre que opere el equipo. PRECAUCION: La estabilidad del vehiculo y su capacidad de frenado pueden afectarse al remolcar un accesorio o un vehiculo adicional. Tenga cuidado con este cambio de condiciones debido a la pendiente. Este simbolo indica precauciones importantes de seguridad.
ESPAÑOL ARMADO 10. Coloque el elemento frontal de remolque dentro del elemento trasero de remolque, como se muestra en la Figura 5. Conecte los dos elementos usando un perno hexagonal (A) y una tuerca hexagonal de cierre (M). Apriete la conexión, pero dejando la tuerca suficientemente floja de manera que los elementos puedan girar libremente. Vea la Figura 5.
ESPAÑOL OPERACIÒN CARRETILLA DE EMPUJE IMPORTANTE: Deje en su lugar el pasador de horquilla en el cierre de la aldaba siempre que use la carretilla como carretilla de empuje. El pasador de horquilla se muestra en la Figura 1 en la página 5. PRECAUCIÓN: Para evitar posibles daños personales, antes de soltar el cierre, asegúrese de que no hay nadie junto al carrito. 1.
ESPAÑOL GUIA DE PENDIENTES (Mantenga esta guía en un lugar seguro para referencia futura.) Use esta guía para determinar si la operación de tractor y carrito es segura en una pendiente. Consulte también las instrucciones en el Manual del Usuario de su vehículo.
FRANÇAIS RÈGLES DE SÉCURITÉ Tout appareil mécanique utilisé incorrectement peut être la cause de blessures. L’utilisateur doit bien en maîtriser le fonctionnement. Observez en tout temps la plus grande prudence lorsque vous utilisez un appareil mécanique. ATTENTION: La stabilité et la capacité de freinage d’un véhicule peut être diminuée par l’ajout d’un accessoire. Soyez vigilant sur les pentes. Ce symbole attire l’attention sur des mesures de sécurité importantes.
FRANÇAIS ASSEMBLAGE 12. Montez une roue avec la tige de la valve face à l’extérieur de l’essieu. Montez un cache-moyeu (Q) en pressant ou en tapant légèrement dessus après l’avoir placé sur l’essieu. Répétez l’opération pour l’autre extrémité de l’essieu. Voir la figure 6. OUTILS NÉCESSAIRES (1) (1) (2) (2) (2) tournevis pinces clés 7/16 po clés 1/2 po clés 9/16 po 13. Retourner le support de roues.
FRANÇAIS FONCTIONNEMENT POUR POUSSER LA CHARRETTE IMPORTANT: La goupille de chape (H) insérée dans la serrure à ressort doit demeurer en place à tout moment lorsque l’on pousse la charrette. Cette pièce est illustrée sur la figure 1 en page 5. ATTENTION: Afin d’éviter tout risque de blessure, assurez-vous que personne ne soit près de la charrette lorsque vous relâchez la serrure à ressort. 1.
FRANÇAIS GUIDE DE CALCUL D’UNE PENTE (Conservez cette feuille en lieu sûr pour référence future.) Utilisez ce guide afin de déterminer si une pente est sécuritaire pour l’utilisation de votre tracteur et de la remorque. Voir également les instructions incluses dans votre manuel d’utilisation du tracteur.
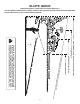
REPAIR PARTS FOR POLY CART MODEL 45-0345 17 19 23 24 19 1 A 6 7 8 A 17 24 9 24 3 28 26 16 11 2 25 2 5 30 32 29 27 10 18 28 15 24 12 14 31 20 13 4 25 18 18 28
REPAIR PARTS FOR POLY CART MODEL 45-0345 REF. NO. PART NO. QTY.
the fastest way to purchase parts www.speedepart.com © 2002 Agri-Fab, Inc. REPAIR PARTS Agri-Fab, Inc. 809 South Hamilton Sullivan, IL. 61951 217-728-8388 www.agri-fab.