
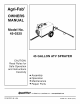
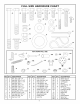
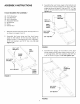
Owner`s manual
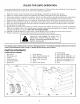


5.
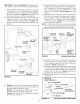
Assemble the axle through the side angles and the
tongue. Fasten the axle to the side angles using two
1/4" x 2" hex bolts and two 1/4" hex lock nuts. Do not
tighten yet. See figure 4.
AXLE
j.°
1/4" HEX
LOCK NUT
FIGURE 4
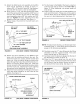
6. Assemble a wheel spacer, a 1" flat washer, a
wheel (valve stem facing out) and another 1" flat
washer onto the axle as shown in figure 5. Place
a 1/8" x 1-1/2" cotter pin through the hole at the
end of the axle, spreading the ends of the pin to
secure it. Repeat on other end of axle.
7. Fill wheel hubs with general purpose grease using
a grease gun.
1" FLAT
WASHER
\ ,,,
1/8" x 1-1/2" WHEEL
COTTER PIN
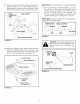
8. Assemble the hitch bracket down through the slot
in the tongue and fasten it to the tongue using a 3/8"
x 1" hex bolt, a 3/8" lock washer and a 3/8" hex nut.
Tighten. See figure 6.
9. Assemble the hitch pin and 1/8" hairpin cotter to
the hitch bracket and tongue. See figure 6.
HITCH PIN
3/8" X 1"
HEX BOLT
BRACKET
FIGURE 6
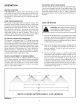
10.
Install the drain in the tank as shown in figure 7.
Place a 3/4" garden hose gasket onto the drain
body and insert the drain body through the bottom
of the tank from the inside. Beneath the tank,
assemble the nylon washer and then the nylon nut
onto the drain body. Tighten the nut securely
enough to prevent leaking, being careful not to
damage the plastic parts. Place the O-ring inside
the nylon cap and screw the cap onto the end of
the drain body.
f
NYLON CAP__ O-RING
FIGURE 5
FIGURE 7