
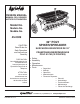
Instructions / Assembly


9
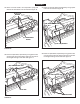
FIGURE 23
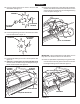
41.Placeoneortwo5/8"atwashersontotheendofthe
spike disk shaft and secure the shaft with a 1/8" x 1-1/2"
cotterpin.Seegure22.
42. Fasten the two drive disks to the shaft using two 1/8" x
1-1/2"cotterpins.Seegure22.
(S) 5/8" FLAT
WASHER
(T) 1/8" x 1-1/2"
COTTER PIN
DRIVE DISKS
FIGURE 22
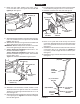
39.Placetwo5/8"atwashersseparatedbyalongspacer
tubeontotheshaft.Seegure20.
FIGURE 20
SPIKE DISK
(AA) SHORT SPACER TUBE
40. Place a spike disk and a short spacer tube onto the shaft.
Fittheshortspacertubeontotheendsoftheanged
bearings in the spike disk and in the end plate. Push the
shaftonthroughtheangedbearingintheendplate.
Seegure21.
(BB) LONG SPACER TUBE
(S) 5/8" FLAT WASHER
FIGURE 21
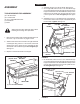
43. Assemble the chain onto the two sprockets on the left
side of the hopper. Fasten the ends of the chain together
usingtheconnectinglink.Seegure23.
44. Place the chain cover over the chain and fasten it to the
hopper end plate using two self tapping screws. See
gure23.
CONNECTING
LINK
(W) CHAIN
(J) SELF
TAPPING
SCREW
ENGLISH