
Instructions / Assembly
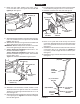


4
TOOLS REQUIRED FOR ASSEMBLY
(2) 7/16" Wrenches
(2) 1/2" Wrenches
(2) 3/4" or Adjustable Wrenches
(1) Screwdriver
(1) Pliers
ASSEMBLY
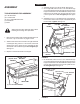
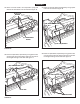
FIGURE 2
4. Assemblethegripontothelifthandle.Seegure2.
5. On the right side, insert a 5/16" x 1-3/4" hex bolt through
a5/16"atwasherandthenthroughtherearholeinthe
hopper and the hitch tube. Assemble the transport tube
and then the lift handle onto the bolt and secure with
a 5/16" nylock hex nut. Do not tighten yet. Seegure
2.
6. Assemble a 5/16" x 1" hex bolt and 5/16" nylock hex nut
to the bottom hole in the transport tube assembly and
the lift handle. Tighten.Seegure2.
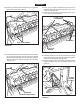
FIGURE 3
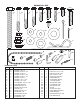
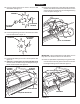
1. Remove the hardware pack and all individual parts from
the carton. Lay out as shown on pages 2 and 3.
2. Attach a hitch tube to the front hole in the right hand side
ofthehopperusinga5/16"x1-1/2"hexbolt,a5/16"at
washer and a 5/16" nylock hex nut. Assemble the bolt
and washer from inside the hopper. Do not tighten yet.
Seegure1.
3. Repeat on the left hand side of the hopper.
FIGURE 1
Spike points are sharp. Exercise caution when
handling and working near spike disks.
HITCH TUBE
(Q) 5/16" FLAT
WASHER
(E) 5/16" 1-1/2"
HEX BOLT
(L) 5/16" NYLOCK HEX NUT
(L) 5/16" NYLOCK
HEX NUT
(Q) 5/16" FLAT
WASHER
(D) 5/16" x 1-3/4"
HEX BOLT
7. On the left side, insert a 5/16" x 1-3/4" hex bolt through
a5/16"atwasherandthenthroughtherearholeinthe
hopper and the hitch tube. Assemble the transport tube
onto the bolt and secure it with a 5/16" nylock hex nut.
Do not tighten yet. Seegure3.
LIFT
HANDLE
TRANSPORT TUBE
(L) 5/16" NYLOCK
HEX NUT
(E) 5/16" x 1"
HEX BOLT
(FF) GRIP
(Q) 5/16"
FLAT WASHER
(D) 5/16" x 1-3/4"
HEX BOLT
ENGLISH