
Product Manual

7
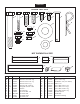
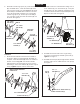
16. Placethelifthandlethroughtheslotinthetray.
Fastenthelifthandletothesmaller,innerholeinthe
middlewheelbracketusingtheboltandnutwhich
youpre-assembledearlier(gure2).Fastenthelift
handletothelarger,outerholeinthewheelbracket
usinga3/8"x1-1/4"hexbolt(C),theshoulderspacer
(U),anda3/8"nylocknut(J).Tighten both nylock
nuts.Seegure11.
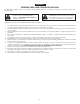
17. Pushthegrip(V)ontothelifthandle.Seegure11.
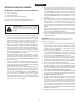
FIGURE 11
FIGURE 12
GRIP (V)
3/8" x 1-1/4"
HEX BOLT (C)
3/8" NYLOCK NUT (J)
SHOULDER
SPACER (U)
PRE-ASSEMBLED
NUT AND HEX BOLT
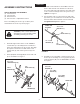
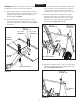
18. Performthefollowingstepsinsequencetoassure
securelockingofthelifthandle.Refertogure12.
a. Turntheaeratorupright,thenplacethelifthandle
intothetransportlockingnotchatthefrontendof
theslotinthetray.
b. Standontherightsideoftheaeratorandpush
againstthetray,whichwillforcethelifthandleover
totherightsideofthenotch.
c. Keepthetrayandlifthandleinthisalignmentand
tightentheeightboltsatthecornersofthetray.
d. Tightenthetwoboltswhichfastenthemiddle
bracetothetray.
e. Afterperformingthesesteps,someeffortshould
berequiredtoshiftthelifthandlefromthe
transportlockingnotchoverintotheslottolower
theaerator.Whentheaeratorisraised,thelift
handleshouldspringbackoverintothetransport
lockingnotch.
c
c
c
c
d
b
a
PUSH AGAINST
THIS SIDE
CAUTION: thelifthandlecandroptothe
rearunexpectedly.Itwillnotlocksecurely
intransportpositionuntilstep"c"below
is completed.
ENGLISH