
Instructions / Assembly


4
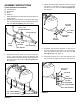
ASSEMBLY INSTRUCTIONS
FIGURE 2
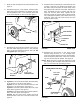
4. Fasten the hitch tubes together at the front using
two 5/16" x 3" hex bolts, four 5/16" lock washers
and two 5/16" hex lock nuts. Do not tighten yet.
See figure 3.
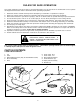
TOOLS REQUIRED FOR ASSEMBLY
(2) 1/2" Wrenches
(1) Screwdriver
(1) Pliers
(1) Hammer
5/16" x 1-5/8"
CURVED HEAD BOLT
AXLE
CLAMP
5/16" LOCK
WASHER
5/16" HEX NUT
HITCH TUBE (RH)
HITCH TUBE (LH)
FIGURE 1
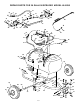
3. Assemble the hitch tubes to the tank using four
5/16" x 1-5/8" hex bolts, 5/16" lock washers and
bowed washers. Place the bowed washers between
the tank and the hitch tubes. Do not tighten yet.
See figure 2.
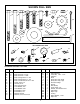
1. Remove all items from carton and lay out as shown on
pages 2 and 3.
2. Assemble the axle clamps to the hitch tubes using
four curved head bolts, 5/16" lock washers and 5/16"
hex nuts. Do not tighten yet. See figure 1.
5/16" x 3"
HEX BOLT
5/16" LOCK
WASHER
5/16" HEX
LOCK NUT
5/16" LOCK
WASHER
FIGURE 3
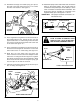
5. Assemble the two hitch brackets to the front of
the hitch tubes using two 5/16" x 2-1/4" hex bolts,
5/16" lock washers and 5/16" hex lock nuts. Do
not tighten yet. See figure 4.
6. Assemble the hitch pin to the hitch brackets and
secure it with the 1/8" hair cotter pin. See figure 4.
5/16" x 2-1/4"
HEX BOLT
5/16" LOCK WASHER
5/16" HEX LOCK NUT
HITCH PIN
1/8" HAIR
COTTER PIN
HITCH
BRACKETS
FIGURE 4
5/16" x 1-5/8" HEX BOLT
5/16" LOCK WASHER
BOWED WASHER