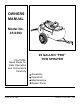
OWNERS MANUAL Model No. 45-0293 CAUTION: Read Rules for Safe Operation and Instructions Carefully 25 GALLON "PRO" TOW SPRAYER Assembly Operation Maintenance Repair Parts PRINTED IN USA FORM NO. 47645 (REV.
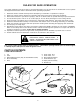
RULES FOR SAFE OPERATION Any power equipment can cause injury if operated improperly or if the user does not understand how to operate the equipment. Exercise caution at all times when operating equipment. 1. 2. 3. 4. 5. 6. 7. 8. 9. Read this owners manual carefully before attempting to assemble or operate this sprayer. Read your vehicle owners manual for operating and safety rules before using this equipment.
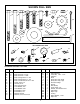
SHOWN FULL SIZE I H A D C B G F E O J Q N P M K R L NOT SHOWN FULL SIZE U S 40 T 20 0 Y Z AA BB V 60 W 100 CC DD HARDWARE PACKAGE - FULL SIZE KEY QTY. A B C D E F G H I J K L M N O 2 2 4 2 2 4 2 6 4 2 16 2 4 4 2 DESCRIPTION KEY QTY.
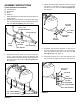
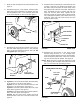
. Fasten the hitch tubes together at the front using two 5/16" x 3" hex bolts, four 5/16" lock washers and two 5/16" hex lock nuts. Do not tighten yet. See figure 3. ASSEMBLY INSTRUCTIONS TOOLS REQUIRED FOR ASSEMBLY (2) 1/2" Wrenches (1) Screwdriver (1) Pliers (1) Hammer 1. Remove all items from carton and lay out as shown on pages 2 and 3. 2. Assemble the axle clamps to the hitch tubes using four curved head bolts, 5/16" lock washers and 5/16" hex nuts. Do not tighten yet. See figure 1.
11. Install the drain in the bottom of the tank as shown in figure 7. Place a 3/4" garden hose gasket onto the drain body and insert the drain body down through the hole in bottom of the tank. Outside the tank, assemble the nylon washer and then the nylon nut onto the drain body. Tighten the nut securely enough to prevent leaking, being careful not to damage the plastic parts. Place the O-ring inside the nylon cap and screw the cap onto the end of the drain body. 7.
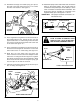
13. Assemble the large and small spray gun clips to the side of the tank using two #10 x 1/2" screws and #10 lock washers. See figure 9. 18. Attach the sprayer to the tractor hitch and connect the wiring to the tractor battery. The red wire must be connected to the positive post on the battery or to the "HOT" connection on a tractor switch or ammeter. The brown wire may be grounded or connected to the negative battery post. See figures 11 and 12.
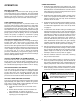
USING THE SPRAYER 1. Determine the application rate (gallons per 1,000 sq. feet or gallons per acre) based on the chemical manufacturers recommendations. Use this rate to help select the pressure setting and tractor speed in the following instructions. OPERATION BEFORE STARTING It is important to test the boom and spray gun with plain water before using chemicals. This will enable you to check the sprayer for leaks and to set the spray pattern and nozzle pressure.
MAINTENANCE 1. Do not store sprayer with any solution left in tank. 2. Periodically clean the strainer in the end of the intake hose at the bottom of the tank. Remove the nylon swivel nut from the hose, pull out the screen and flush it with clear water. 3. Periodically clean the strainers in the boom nozzles. Remove the nozzle, pull out the screen and flush it with clear water. AFTER EACH USE 4.
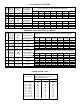
U.S. GALLON TIP CHART Tip Spray No. Height Inches #3 Tip No. #3 13" Spray Height Inches 13" Pressure PSI 10 20 30 Pressure PSI 10 20 30 Tip Capacity US Gallons Per Minute .30 .42 .52 GALLONS PER ACRE (BASED ON WATER) 1 MPH 44.2 63 76.8 Tip Capacity US Gallons Per Minute .30 .42 .52 2 MPH 22.1 31.5 38.4 3 MPH 14.8 20.9 25.8 4 MPH 11.1 15.7 19.3 5 MPH 8.9 12.6 15.4 7.5 MPH 10 MPH 5.9 4.4 8.4 6.3 10.3 7.7 GALLONS PER 1000 SQ. FT. (BASED ON WATER) 1 MPH 1.0 1.4 1.8 2 MPH 0.50 0.72 0.88 3 MPH 0.
REPAIR PARTS FOR 25 GALLON SPRAYER MODEL 45-0293 41 71 61 28 7 27 27 27 71 38 71 64 41 39 36 40 42 36 27 B 39 40 43 27 25 57 63 37 A C 42 43 67 27 65 60 59 61 8 7 21 6 70 24 61 23 B 9 10 26 2 69 22 A 14 13 12 11 20 18 4 21 3 15 35 1 68 56 54 19 54 53 56 72 61 5 34 7 73 75 74 C 76 48 55 46 30 47 48 62 55 52 44 32 34 50 31 48 58 62 32 50 66 48 51 33 46 48 31 29 45 48 66 10 49
REPAIR PARTS LIST FOR 25 GALLON SPRAYER MODEL 45-0293 REF. NO. PART NO. QTY.
AGRI-FAB ® LIMITED WARRANTY WHO IS COVERED: This Warranty covers only the original retail purchaser of an AGRI-FAB ® product or part. It is not transferable. HOW LONG DOES COVERAGE LAST: This Warranty remains in force for 1 year from the date of purchase. WHAT IS COVERED: Any defect in material or workmanship of your AGRI-FAB ® product or part. WHAT IS NOT COVERED: 1. This warranty does not apply to the engine or components parts thereof.