
Instructions / Assembly


7
OPERATION
BEFORE STARTING
It is important totesttheboomandspraygunwithplain
waterbeforeattemptingactualspraying.Thiswillenableyou
tocheckthesprayerforleaksandtosetthespraypattern
andnozzlepressure.Ifaleakshouldoccur,threadtape
maybeusedtobettersealthetting.
PUMP PRESSURE SWITCH
Thepumpisequippedwithapressureswitch.Thepressure
switchsensesoutletpressureofthepumpandwillturnoff
theelectricalpowertothepumpatapredeterminedhigh
pressurepoint(35PSI).Iftheowdemandisverylow,the
pumpmayreachthishighpressurepointandtheswitchwill
cause"cycling"(thepumpcyclesonandoffrapidly).Thisis
notaproblemunlessthepumpissubjecttocontinuouscycling
withinonesecondintervalsforlongperiodsoftime.
ON-OFF ADJUSTMENT OF BOOM NOZZLES
ThesprayerisequippedwithanON-OFFvalvefortheboom
whichallowstheowtotheboomnozzlestobeshutoff.
ADJUSTING SPRAY GUN NOZZLE
Turnthenozzleonthesprayguntoadjustthesprayfrom
a cone shaped ne mist to a straight stream. Maximum
spraygunpressureisattainedwhentheON-OFFvalveis
shutoff.
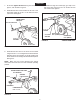
SETTING THE BOOM FOR SPRAYING
The correct positioning of the boom places the nozzles
approximately40"apartand 14"abovetheground.This
givesaspraywidthofapproximately80"withaslightcenter
overlap.Seegure10.
a. Slidetheboombarsouttotheendsofthe
slots.
b. Swiveltheboombarsuntilthenozzlesare
approximately14"abovetheground.
c. Makesurethenozzlesareadjustedsothatthe
openingspointstraightdown.
FIGURE 10
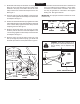
USING THE SPRAYER
1. Determinetheapproximatesquarefootageofthearea
tobesprayed.Usethisamounttoestimatethenumber
of gallons that will be required, based on product
recommendations. This can help avoid unneeded
solutionleftinthetank.
2. Determinetheapplicationrate(gallonsper1,000sq.feet
orgallonsperacre)basedonthechemicalmanufacturers
recommendations.
3. Usethetipchartonpage9todeterminetheground
speedthatwillachievetherecommendedapplication
rate.
4. Todeterminethethrottlesettingforattainingthedesired
groundspeed,markoff100,200and300feetintervals.
Thespeedchartatthebottomofpage9indicatesthe
numberofsecondsittakestotravelthesedistances.Set
thethrottleand,witharunningstart,travelthedistances
inthenumberofsecondsindicatedbythespeedchart.
Onceyouhavedeterminedthethrottleandgearsettings
needed,markthethrottlelocationsothatyoucaneasily
resumethesamespeedafterstopping.
5. Add the chemical solution to the tank, following the
product instructions.
6. Drivetothestartingplaceforspraying.
7. Settheboominpositionforspraying.
8. Setthethrottleatthepositiondeterminedinstep4.
Reachbackandipthepump/motorswitchtothe"ON"
position to start spraying.
9. Stayclearofowers,shrubsandevergreentreeswhen
spraying weed control solutions to prevent contact of
thesolutionwiththesesensitiveplants.
CAUTION: WEAR EYE PROTECTION,
GLOVES AND PROTECTIVE CLOTHING
WHEN HANDLING AND WORKING WITH
LAWN CHEMICALS.
80"
40"
14"
ENGLISH