™ owners manual MANUAL DEL USUARIO NOTICE D’UTILISATION Model No. Modelo No. Modèle No. 45-01842 45-02402 190-425B CAUTION: Read Rules for Safe Operation and Instructions Carefully PRECAUCION: Lea cuidadosamente los Procedimientos e Instrucciones para la Operación Segura de la Máquina. ATTENTION: Lire et suivre attentivement les instructions et consignes de sécurité de cette notice.
ENGLISH SAFETY RULES Remember, any power equipment can cause injury if operated improperly or if the user does not understand how to operate the equipment. Exercise caution at all times when using power equipment. CAUTION: VEHICLE BRAKING AND STABILITY MAY BE AFFECTED WITH THE ADDITION OF AN ACCESSORY OR AN ATTACHMENT. BE AWARE OF CHANGING CONDITIONS ON SLOPES. LOOK FOR THIS SYMBOL TO POINT OUT IMPORTANT SAFETY PRECAUTIONS. IT MEANS – ATTENTION! BECOME ALERT! YOUR SAFETY IS INVOLVED. 1. 2. 3. 4. 5. 6.
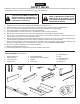
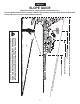
ENGLISH HARDWARE SHOWN FULL SIZE E A B G F D C H K J Not Shown Full Size I L N O M FIGURE 1 - HARDWARE PACK ref. description 45-02402 45-01842 190-425B A Hex Bolt, 5/16-18 x 4" 1 1 B Hex Bolt, 1/4" x 3/4" 33 33 C Hex Bolt, 3/8" x 1" 1 1 D Truss Hd. Bolt, 5/16" x 3/4" 14 14 E Nylock Nut, 1/4" 33 33 F SEMS Nut, 5/16" 2 2 G Nylock Nut, 5/16" 15 15 H Nylock Nut, 3/8" 1 1 I Flat Washer, 1" 6 6 J Cotter Pin, 1/8" x 1-1/2" Lg.
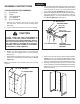
ENGLISH ASSEMBLY INSTRUCTIONS 5. Position the tailgate reinforcement bracket on outside of cart as shown in figure 3. Assemble to the bottom of the cart body using four 5/16" x 3/4" truss head bolts and 5/16" nylock nuts. Do not tighten yet. See figure 3. 6. Position the tailgate guides on the inside of the cart bodies with guide channels to the front as shown in figure 3. Assemble using four 1/4" x 3/4" hex bolts and 1/4" nylock nuts. Do not tighten yet. See figure 3.
ENGLISH 9. Assemble the front panel over the end of the cart using six 1/4" x 3/4" hex bolts and 1/4" nylock nuts as shown in figure 5. Leave two holes in the bottom of the panel empty as shown. With the cart body halves pulled together, tighten the bolts in the bottom of the front panel, then tighten the bolts in the sides. See figure 5. 11. Turn the latch stand bracket so that the aligning tab is at the rear (bottom) of the bracket.
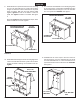
ENGLISH 16. Hook the short end of the spring into the hole in the latch lock lever. Use the spring puller tool to hook the long end of the spring into the square hole in the tongue. The spring puller tool can be stored when finished. See figure 11. 13. To prevent accidental tipping during the following assembly procedures, lower the cart to rest upside down on its top flanges, so that the wheel support is facing up. See figure 9. 14.
ENGLISH 19. Assemble the end of the hitch bracket (two holes) down through the slot at the front of the drawbar tongue. Fasten it to the tongue using the 3/8" x 1" hex bolt, and 3/8" nylock nut. Tighten. See figure 13. 20. Assemble the hitch pin through the hitch bracket and the tongue and secure with the 1/8" hair cotter pin. See figure 13. NOTE DO NOT EXCEED WEIGHT CAPACITY OF CART (See the specifications on this page for each model) One cubic foot of dirt weighs approximately 80 lbs. 5.
ENGLISH 8
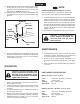
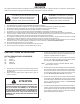
ENGLISH (Keep this sheet in a safe place for future reference.) Use this guide to determine if a slope is safe for the operation of your tractor and cart. Refer also to the instructions in your vehicle owners manual. SLOPE GUIDE SIGHT AND HOLD THIS LEVEL WITH A VERTICAL TREE A POWER POLE A CORNER OF A BUILDING OR A FENCE POST F O L D A LONG DOTTE D L IN E , REPR ESENT ING A 1 0 DEGRE E SLO PE CAUTION: DO NOT OPERATEYOUR TRACTOR AND CART ON A SLOPE IN EXCESS OF 10 DEGREES.
FRANÇAIS SÉCURITÉ Tout appareil mécanique utilisé incorrectement peut être la cause de blessures. L’utilisateur doit bien en maîtriser le fonctionnement. Observez en tout temps la plus grande prudence lorsque vous utilisez un appareil mécanique. Attention: La stabilité et la capacité de freinage d’un véhicule peut être diminuée par l’ajout d’un accessoire. Soyez vigilant dans les pentes. Ce symbole attire l’attention sur des mesures de sécurité importantes.
FRANÇAIS 8. 9. IMPORTANT: Assurez-vous que la barre de traction d'attelage est solidement verrouillée au support de soutien d'attelage au moyen du levier loquet de verrouillage. Renversez avec précaution la position de la remorque de telle sorte qu’elle repose sur la partie arrière, sur le support de consolidation de hayon qui vient juste d’être assemblé, comme montré dans la figure 4. Procédez ensuite aux étapes de montage qui suivent. 17.
FRANÇAIS UTILISATION ENTRETIEN ATTENTION: La stabilité et la capacité de freinage d’un véhicule peut être diminuée par l’ajout d’un accessoire. Soyez vigilant dans les pentes. 1. Se référer au manuel du tracteur pour des instructions précises concernant la conduite en pentes. 2. Utiliser le guide fourni en page 13 de ce manuel pour savoir si l’angle de la pente est trop prononcé pour une conduite sécuritaire. 3.
FRANÇAIS (Conservez cette feuille en lieu sûr pour référence future.) Utilisez ce guide afin de déterminer si une pente est sécuritaire pour l’utilisation de votre tracteur et de la remorque. Voir également les instructions incluses dans votre manuel d’utilisation du tracteur.
ESPAÑOL REGLAS DE SEGURIDAD Cualquier equipo movido por motor puede causar lesiones si se opera inadecuadamente o si el usuario no entiende cómo debe operarlo. Manténgase atento y cauteloso siempre que opere el equipo. PRECAUCION: LA ESTABILIDAD DEL VEHICULO Y SU CAPACIDAD DE FRENADO PUEDEN AFECTARSE AL REMOLCAR UN ACCESORIO O UN VEHICULO ADICIONAL. TENGA CUIDADO CON ESTE CAMBIO DE CONDICIONES DEBIDO A LA PENDIENTE. ESTE SIMBOLO INDICA PRECAUCIONES IMPORTANTES DE SEGURIDAD.
ESPAÑOL 7. En este momento, con las dos mitades del cuerpo del carrito juntas, apriete los cuatro tornillos con cabeza reforzada colocados en el paso 5 y, a continuación, los cuatro tornillos con cabeza hex. colocados en el paso 6. De momento, deje flojos los tornillos colocados en el paso 4. 8. Con mucho cuidado, invierta la posición del carrito, de modo que descanse sobre el extremo con el soporte de refuerzo de la puerta trasera recién montado, tal y como se muestra en la figura 4.
ESPAÑOL MANTENIMIENTO OPERACIÒN PRECAUCIÓN: LA CAPACIDAD DE FRENADO Y LA ESTABILIDAD DEL VEHÍCULO PUEDEN VERSE AFECTADAS POR LA UTILIZACIÓN DE CUALQUIER TIPO DE ACCESORIO. TENGA EN CUANTA LAS CONDICIONES CAMBIANTES CUANDO TRABAJE EN PENDIENTES. 1. Consulte el manual de usuario del vehículo para ver las instrucciones sobre funcionamiento seguro en pendientes. 2.
ESPAÑOL (Mantenga esta guía en un lugar seguro para referencia futura.) Use esta guía para determinar si la operación de tractor y carrito es segura en una pendiente. Consulte también las instrucciones en el Manual del Usuario de su vehículo.
REPAIR PARTS FOR UTILITY CARTS MODEL NO'S.
REPAIR PARTS LIST FOR UTILITY CARTS MODEL NO'S. 45-01842, 45-02402 & 190-425B REF. NO. PART NO.
the fastest way to purchase parts www.speedepart.com REPAIR PARTS Agri-Fab, Inc. 303 West Raymond Sullivan, IL. 61951 217-728-8388 www.agri-fab.com This document (or manual) is protected under the U.S. Copyright Laws and the copyright laws of foreign countries, pursuant to the Universal Copyright Convention and the Berne convention.