Aggrieve OWNERS MANUAL Model No. 45-02181 26" LEAF/LAWNSWEEPER CAUTION: | e Safety Read Rules for | e Assembly Safe Operation | e Operating and Instructions | e Maintenance Carefully | « Repair Parts Call 1-800-448-9282 for missing parts or assembly help. Speedup; arf the fastest way lo purchase pairs Www.speetepart.com PRINTED IN USA FORM NO.
SAFETY RULES Remember, any equipment can cause injury if operated improperly or if the user does not understand how to operate the equipment. Exercise caution at all times when using this equipment. LOOK FOR THIS SYMBOL TO POINT OUT f) IMPORTANT SAFETY PRECAUTIONS. IT f) STABILITY MAY BE AFFECTED WITHE CAUTION: VEHICLE BRAKING AND ADDITION OF AN ACCESSORY OR AN ATTACHMENT. BE AWARE OF CHANGING CONDITIONS ON SLOPES. MEANS — ATTENTION! BECOME ALERT! YOUR SAFETY IS INVOLVED.
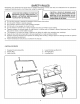
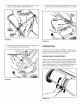
HARDWARE PACK (NOT SHOWN FULL SIZE) ie Ref. | Description Qty. No. A Hex Boll, x 8 B Flat Washers 1/4" 1.0. 4 c Shylock Nuts 8 Do Bag Rod Clips 4 F Palms 1/4" 2 G Plastic Caps (for bag rods) 2 H Plastic Caps (for leg stands) 2 ASSEMBLY INSTRUCTIONS TOOLS REQUIRED FOR ASSEMBLY (1) Phillips Screwdriver (1) Adjustable Wrench (1) 7116" Open End or Box Wrench 1. Assemble the two Handle Leg Stand Tubes io the Sweeper Housing, using two hex bolts x long, flat washers and nylon nuts, per handle. See figure 1.
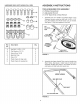
3. Now tighten the four bolts from step 1. 4, Assemble a bag rod clip to the inside of each lower handle tube using a hex bolt secured down against the clip with a 1/4" nylon nut. The clips should face towards the sweeper housing. See figure 3. 1/4" SHYLOCK i 5 “BAG ROD CLIP FIGURE 8 5. Slidethelongbagrod long) through the stitched bag flap on the top of the hopper bag as shown in figure 4. 8. Clotheshorse bag rod long) through the stitched bag flap on the bottom of the hopper bag as shown in figure 4.
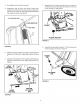
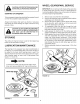
8. Place the upper hopper bag and bag rod into the bag 11. Hook the elastic straps on the bag flaps under the bag rod clips on the hopper handle. See figure 7. rod clips on the lower handle tubes as shown in figure 9. = top oF worry BAG AND ROD LOWER HANDLE UPPER HANDLE BAG ROD CLIPS FIGURE 7 FIGURE § 10. Place the lower hopper bag and bag rod into the opening on the sweeper housing. See figure 8. OPERATION Take care when operating your sweeper.
CAUTION: EYE PROTECTION SHOULD BE WORN WHILE OPERATING SWEEPER DUMPING OF SWEEPER To dump sweeper hopper bag, simply tithe sweeper forward or lit off the complete hopper bag frame Always dump hopper after each use, Damp or wet grass and leaves will cause damage to hopper if stored for long periods of time, CAUTION: DO NOT DUMP THE SWEEPER TOO CLOSET AFIRE HASTE BRUSHES AND BAG CAN BE DESTROYED BY EXCESSIVE HEAT OR FLAME.
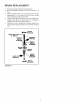
BRUSH REPLACEMENT Turnover the hopper bag from lawn sweeper, Brush replacement should be done one brush at a time, 3. Tip the sweeper forward on housing for ease of brush replacement. Do not remove hex bolt from double brush retainers through brush shaft, 4. Loosen hex bolts and hex lock nuts from single brush retainers. See figure 13. Slide brush out of retainers, making not of overlap bristles position. 5.
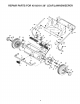
REPAIR PARTS FOR 45-02181 26" LEAF/LAWNSWEEPER REF. | PART REF. | PART NO. HNO. QTY. DESCRIPTION NO. HNO. QTy. DESCRIPTION 1 44800 1 Housing 28 44125 4 Flat Washer, 62x 1" 4 43881 1 Bolt, Carriage x | 28 44687 2 Plastic Cap, .207 5 44880 1 Washer, Square Nylon 30 1680-21 4 Retaining Ring, .
Speed: art He Fastest way fo purchase pairs Www.speedepart.com REPAIR PARTS Agra-Fab, Inc. 303 West Raymond Sullivan, iL. 61951 217-728-8388 This document {or manual) is protected under the U.S. Copyright Laws and the copyright laws of foreign countries, pursuant to the Universal Copyright Convention and the Bern convention.