
Use and Care Guide


6
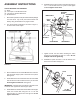
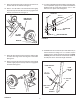
17. Placea5/16"atwasherontotheendoftheowcontrol
rod.Inserttheendoftherodthroughtheslotintheow
control mounting bracket and through the hole in the
owcontrollink.Securewitha3/32"x3/4"cotterpin.
Seegure9.
FIGURE 9
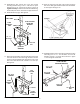
18. Hookthefreeendoftheowcontrolrodthroughthe
hole in the slide gate bracket located near the bottom
ofthehopper.Seegure10.
FIGURE 10
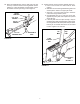
19. Assembletheowcontrolmountingbrackettothehitch
tube using two 1/4" x 1-1/2" hex bolts, six 5/16" at
washersandtwo1/4"nylocknutsasshowningure
11. Do not tighten at this time.
FIGURE 11
FLOW
CONTROL
ROD
FLOW
CONTROL
LINK
3/32"
COTTER
PIN
5/16" FLAT
WASHER
SLOT
FLOW CONTROL
MOUNTING BRACKET
1/4" x 1-1/2"
HEX BOLT
1/4" NYLOCK
NUT
5/16" FLAT
WASHER
5/16" FLAT
WASHER
15. Assemble the ow control arm to the ow control
mounting bracket using a 1/4" x 1" hex bolt, two nylon
washersanda 1/4" nylocknut asshownin gure 8.
Tighten carefully. Theowcontrolarmshouldbesnug,
but should pivot with no more than a slight resistance.
16. Assemblethevinylgrip.Seegure8.
FIGURE 8
1/4" x 1"
HEX BOLT
1/4" NYLOCK
NUT
FLOW CONTROL
MOUNTING
BRACKET
FLOW
CONTROL
ARM
(2) NYLON
WASHERS
VINYL GRIP