
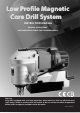
User Manual


7
thread the loose end of the strap through the loop and pull tight. Push on the spring buckle to release strap.
MOUNTING ANNULAR CUTTERS
CAUTION: Never use a cutting tool that is larger than the maximum rated capacity of the
machine.
1. To insert an annular cutter, first insert the pilot pin into the cutter.
2. Whenever mounting or removing cutters, always unplug the machine.
3. Lower the arbor.
4. Push up on the quick-release collar. Insert the cutter with pilot pin and
turn until the flat meets the locking pin. When the flat meets the locking
pin, the collar will snap down. Double check to ensure that it is fully
locked.
5. To remove, lower the arbor, push up on the quick-release collar and
remove the cutter.
OPERATION-GENERAL
WARNING: Always ensure that the magnet is adhered properly to the work piece before beginning
drilling.
NOTE: If mounting to a curved surface beam, mount the machine parallel to the curve in the work
piece.
WARNING: Avoid operating at more than 90 degrees from horizontal. When drilling at such an angle
take precautions to prevent cutting coolant from entering the motor. Paste-type stick lubricant should
be used.
1. First fit tool into arbor and line up with intended center of
cut. Then switch magnet on.
2. Press green motor on button to start motor. Use the crank
handle to feed to work. Always use very light pressure when
beginning the cut and just as the tool is breaking through.
The crank handle offers tremendous leverage; so do not use
too much force. Allow the cutting tool to determine the
Quick-release collar
Arbor