
User's Manual


AGM Global Vision14
2.1.16 INSTALLING THE RATTLERN ON A PICATINNY/WEAVER
RAIL
WARNING:
Always make sure your firearm is unloaded before you place the scope on the
firearm. Reconfirm that the chamber is empty if you stop the procedure then
resume later. Safe firearms handling rules should be followed at all times.
The Rattler comes fully-assembled with a Picatinny/Weaver mount. The mount
is attached to the scope with two screws.
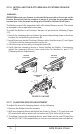
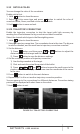
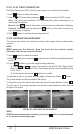
To install the Rattler on a Picatinny/ Weaver rail, perform the following (Figure
2-5) :
1. Unlock the clamping device of the scope mount by pushing down on the lever
holders (A) and unlocking the levers (B).
2. Install the scope on the Picatinny/ Weaver rail so that the stops (C, see Figure
2-3) slides into the transverse slots on the rail.
3. Affix the scope to the rail by locking the levers (B).
4. Verify that the clamping device is firmly holding the Rattler. If necessary,
adjust the clamping device’s lever-cam locks as detailed in part 2.1.17
(Clamping Device Adjustment).
2.1.17 CLAMPING DEVICE ADJUSTMENT
To adjust the mount’s clamping device, do the following:
1. Remove the Rattler from the weapon.
2. With the clamping device unlocked (as shown in Figure 2-5), push the cam
(E) towards the arrow, which will cause the nut (D) to slide out of its hole.
3. To tighten/ loosen the clamping device, push down on the cam (E) and turn
the nut (D) CW/ CCW respectively, in one-two increments (see note below).
FIGURE 2-5. MOUNT
LOCKED
POSITION
B
B
A
A
UNLOCK
POSITION
UNDERSIDE
VIEW
C
C
E
D
D