Agilent VEE Pro 9.
Notices © Agilent Technologies, Inc. 2013 Warranty No part of this manual may be reproduced in any form or by any means (including electronic storage and retrieval or translation into a foreign language) without prior agreement and written consent from Agilent Technologies, Inc. as governed by United States and international copyright laws. The material contained in this document is provided “as is,” and is subject to changed, without notice, in future editions.
Contents Introduction 2 Installing Agilent IO Libraries 2 Installing Agilent VEE Pro 4 Launching Agilent VEE Pro 8 Instrument Communication Tutorial 9 Virtual Source Tutorial 13 Agilent VEE 9.32 New Features 19 Agilent Connectivity Products 20 Agilent Support, Services, and Assistance 21 Appendix 22 Agilent VEE Pro 9.
Introduction Welcome to the Agilent VEE family! Agilent Visual Engineering Environment (VEE) is a powerful visual language environment that dramatically reduces your development time. To get you started quickly on Agilent VEE, we have prepared this guide to show you how to install and use your new software. This guide also contains two tutorials that show you how to communicate with an instrument via the USB interface, and how to generate and display a waveform from a virtual source.
3 The Agilent Connection Expert Welcome Screen window will appear. This application configures the instruments that are connected to your PC. You may close this window before proceeding to the next step. Agilent VEE Pro 9.
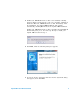
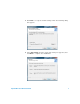
Installing Agilent VEE Pro 1 Insert the Agilent VEE Installation CD- ROM and click Install Agilent VEE Pro 9.32. The InstallShield Wizard will guide you through the installation process. 2 The InstallShield Wizard will check if Agilent IO Libraries Suite 16.3.16603.3 is installed. If it is not, the following message box will appear. Please note that Agilent IO Libraries Suite 16.3.16603.3 is a prerequisite if you communicate with instruments using Agilent VEE.
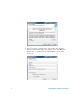
4 If Microsoft .NET Framework 3.5 SP1 is not installed, following Question dialog box will appear to ask you to install it. Click Yes to install the Microsoft .NET Framework 3.5 SP1 immediately. After the installation, the Agilent VEE installation will continue automatically. Clicking No will abort the Agilent VEE installation. If Microsoft .NET Framework 3.5 SP1 is installed, the InstallShield Wizard will guide you to the next step directly to install your Agilent VEE selection in Step 1.
7 Type your name, company name, and product key when the Customer Information dialog box appears, then click Next. The product key is contained in the AgilentVEE Pro Product Key Certificate. 6 Agilent VEE Pro 9.
8 Click Next to accept the default settings when the following dialog box appears. 9 Select Typical Setup when the Setup Type dialog box appears, then click Next to complete the installation. Agilent VEE Pro 9.
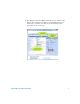
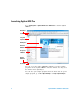
Launching Agilent VEE Pro Go to All Programs > Agilent VEE Pro 9.3 > VEE Pro 9.3 to launch Agilent VEE Pro. Menu Bar Toolbar Program Explorer Workspace Welcome Window Properties Window Output Window Status Bar You can access the demos, MATLAB examples as well as sample programs via the Agilent VEE Pro welcome window. You may close the window after exploring it. You can also open sample programs from the menu bar. To open a sample program, go to File > Open Example ...or Help > Open Example....
Instrument Communication Tutorial In this tutorial, we will connect to an instrument via the USB interface. Ensure that the Agilent IO Libraries Suite 16.3.16603.3 is installed before proceeding. If you do not have a USB instrument, the tutorial for a GPIB instrument is similar from Step 3 onwards. 1 Connect to an instrument via any USB port on your PC. Then, turn on the instrument. The Found New Hardware Wizard dialog box will appear. Just step through the wizard by clicking Next.
5 Right click newInstrument in the Instrument List panel. Then, choose Create Direct I/O Object to place a Direct I/O object for the selected newinstrument on the workspace. This object allows you to send/receive commands to/from your instrument. 6 Double- click the Direct I/O object blue transaction bar to add a transaction to the Direct I/O object. 7 Type "*IDN?" (include the quotation marks) in the I/O Transaction dialog box as shown below.
*IDN? is one of standard commands for programmable instruments (SCPI) command that queries the instrument for its identification string. 8 After sending the "*IDN?" query to the instrument, you need to read back its response. Double- click the text box of the newInstrument object to add a new transaction. This time, select the transaction to READ a STRING FORMAT text to an output terminal named x. The output terminal x will be automatically created when you click OK. Agilent VEE Pro 9.
9 Select Display > AlphaNumeric and place an AlphaNumeric object on the workspace to the right of the Direct I/O object. 10 You will now connect the Direct I/O object to the AlphaNumeric object. Place the mouse cursor beside the Direct I/O output terminal and a square icon will appear. Left- click and drag a line to the input terminal of the AlphaNumeric object. Left- click again to complete the connection. 11 Run the program by clicking the Run button on the toolbar.
Virtual Source Tutorial In this tutorial, you will generate and display a waveform from a virtual source. No instrument is needed. 1 If you have an existing program in your Agilent VEE Pro workspace, select File > New. Then, select Device > Virtual Source > Function Generator and place a function generator object on the workspace. 2 By default, the function generator will generate a virtual cosine waveform at a frequency of 200 Hz, and an amplitude of 1. Agilent VEE Pro 9.
3 Select Display > XY Trace and place an XY Trace object to the right of the function generator. 4 Connect the function generator output terminal to the input terminal of the XY trace. Place the mouse cursor beside the function generator output terminal and a square icon will appear. Left- click and drag a line to the input terminal of the XY Trace object. Left- click again to complete the connection. 14 Agilent VEE Pro 9.
5 Click the Run button on the toolbar and you can see the cosine waveform displayed on the XY Trace object. 6 Select Display > Spectrum (Freq) > Magnitude Spectrum and place a Magnitude Spectrum object on the workspace below the XY Trace object. Agilent VEE Pro 9.
7 Connect a second line from the output of the function generator to the input of the Magnitude Spectrum object using the same left- click and drag method as described in Step 4. 8 Click the Run button and observe the magnitude spectrum display. As the waveform is a 200 Hz cosine, the magnitude spectrum displayed will be a vertical line at the frequency of 200 Hz. 16 Agilent VEE Pro 9.
9 Change the waveform function on the virtual function generator to a square waveform. 10 Click the Run button and observe the difference. Agilent VEE gives you the flexibility to analyze your signal source in multiple graph displays simultaneously. Agilent VEE Pro 9.
11 To save your VEE code, select File > Save As and name the file as Tutorial 2.vee. 18 Agilent VEE Pro 9.
Agilent VEE 9.32 New Features Windows 8 Supportability Agilent VEE 9.32 supports Windows 8 (Professional and Enterprise with 32- bit and 64- bit supportability). Note that the 64- bit support has a 32- bit application running on WOW64 (Windows- on- Windows 64- bit) emulator. Microsoft Office Excel 2013 Supportability Agilent VEE 9.32 (and above) existing built- in Excel menu supports Microsoft Office Excel 2013. However, new features in Microsoft Office Excel 2013 are not supported.
Agilent Connectivity Products E5810B LAN/GPIB/USB Gateway 82350B PCI GPIB Interface 82357B USB/GPIB Interface 10833X GPIB Cable 82351A PCIe GPIB Interface Agilent provides a complete range of high performance and highly reliable products to connect from your PC to your instruments. These include LAN/GPIB/USB gateway, GPIB cable, and PCI GPIB, PCIe GPIB, and USB/GPIB interfaces. For more information on Agilent connectivity products, visit www.agilent.com/find/gpib. 20 Agilent VEE Pro 9.
Agilent Support, Services, and Assistance With Agilent VEE Pro, you have access to the Agilent worldwide resources for start- up assistance, training classes, and update services. As part of the purchase of any Agilent VEE product you are entitled to receive technical support free of charge. There is no need to register. Additional consulting services are available from Agilent.
Appendix Agilent VEE Pro Help is now available in other languages. To use online help file in other languages, please 1 Download localized online help from www.agilent.com/find/vee. 2 Save downloaded files into the installation directory of Agilent VEE. Generally, it is C:\Program Files\Agilent\VEE Pro 9.3 (32- bit operating system) or C:\Program Files (x86)\Agilent\VEE Pro 9.3 (64- bit operating system). Please do not change the name of the downloaded online help files. 3 Open Agilent VEE software.
www.agilent.