
User`s guide


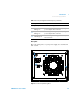

Table Of Contents
- Agilent U8030A Series Triple Output DC Power Supply
- Table of Contents
- List of Figures
- List of Tables
- Introduction
- Operation and Features
- Constant Voltage Operation
- Constant Current Operation
- 5 V Operation
- Track Mode Operation
- Output On/Off Operation
- Memory Operations
- Memory Output Operations
- Programming the Overvoltage Protection
- Programming the Overcurrent Protection
- Keylock Operation
- System-Related Operations
- Extending the Voltage and Current Range
- Characteristics and Specifications
Introduction 1
Preparing Your Power Supply
U8030A Series User’s Guide 23
3 Turn on the power supply.
Ensure that all the outputs are disabled (the OFF
annunciator is turned on).
4 Enable the output for Output 1.
Press the [Output 1 On/Off] button (the OFF annunciator for
OUT1 turns off). Notice that the display is in the meter
mode.
5 Adjust the voltage limit value to 1.00 V.
Press the [Display Limit] button to set the display to the
limit mode (the LIMIT annunciator turns on).
Adjust the voltage limit to 1.00 V to ensure constant
current (CC) operation. The CC annunciator will turn on.
Press the [Display Limit] button again or allow the power
supply to idle for a few seconds to exit the limit mode.
6 Check that the front- panel ammeter properly responds to
the knob control for Output 1.
Press the [Voltage/Current] button. Ensure that the A
annunciator is blinking before proceeding with the next
step.
Turn the knob clockwise or counterclockwise when the
display is in the meter mode (the LIMIT annunciator is
off). Check that the ammeter responds to the knob control
and the voltmeter indicates nearly zero (the voltmeter will
show the voltage drop caused by the test lead).
7 Ensure that the current can be adjusted from zero to the
full rated value by adjusting the knob.
8 Repeat step 1 to step 7 for Output 2. Press [1] or [2] to
switch between Output 1 and Output 2 (the OUT1 and
OUT2 annunciators will turn on and off respectively).
9 Disable the outputs, turn off the power supply, and
remove the short from the output terminals.