
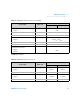
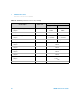
Technical data
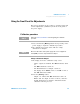


Calibration Procedures 1
Using the Front Panel for Adjustments
U8030A Series Service Guide 29
Using the Front Panel for Adjustments
This section describes the procedures to perform voltage and
current adjustments (calibrations) from the front panel of
the power supply.
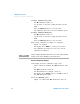
Calibration procedure
1 Press and hold the [Memory] button when powering on the
power supply to begin the calibration procedure.
2 The calibration procedure starts with the voltage
calibration for Output 1.
Voltage calibration for Output 1
1 The display shows the calibration setup screen.
• All the outputs are disabled. The OFF annunciator turns
on.
• The OUT1 annunciator turns on.
• The CV annunciator for Output 1 turns on.
• The display shows SET UP on line 1 and CAL on line 2.
The CAL annunciator blinks.
2 Press the [Memory] button.
• Output 1 is enabled. The OFF annunciator turns off.
• Ensure that the output is in the CV mode, otherwise
the CC annunciator for Output 1 will blink and the
calibration will not proceed.
NOTE
Review the “Test Considerations” before beginning the calibration
procedure.
NOTE
Disconnect all loads from the power supply, and connect a digital volt
meter (DVM) across the output terminals of Output 1.