
Installation guide


11
Instructions
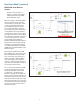
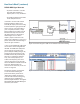
5. Press {Return}. Press {Meas Setup} (see Figure 18).
Meas Setup (Measurement Setup) menu allows you to set up the relative
measurement or set display offsets.
• Freq: Allows setting for the frequency of the RF signal that you are measuring.
It optimizes the accuracy and minimizes measurement uncertainty, especially
when making comparative measurements between signals.
• Power Range: Allows you to set the power range either in Auto or Manual. You
are encouraged to use Auto range when they are not sure of the power level
they are about to measure.
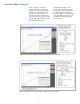
In Manual range, there are two manual setting: “LOWER” and “UPPER”.
LOWER range covers the power from -60 to -10dBm. UPPER range covers the
power from -10 to +20dBm.
• Limits: Indicates the measurement result is beyond the confi gured upper or
lower limit.
• Rel/Offset: Rel (Relative) mode enables comparison of a measurement result
to a reference value. The relative reading, or difference, can be displayed in
either dB or % terms. Offset setting can be confi gured to compensate for
signal loss or gain (in dB) in your test setup.
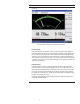
• Averaging: Allows you to set the measurement averaging in Auto or Manual
mode, to average power readings.
The purpose of averaging is to reduce noise, obtain the desired resolution, and
to reduce the jitter in the measurement results. Increasing the value of the
measurement average reduces measurement noise, but the measurement time
is increased. The default of Averaging is Auto.
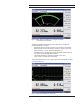
• Step Detect: Used to reduce the fi lter settling time after a signifi cant step in
the measured power. The fi lter can be set to re-initialize upon detection of a
step increase or decrease in the measured power.
• Meas Interval: Allows you to set the time (in s or ms) to capture the new
power measurement continuously.
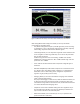
Figure 18 Measurement Setup menu with meter-view display measurement