
Technical data

Installing and Connecting the LCR Meter
4 Agilent GUI Data Logger Quick Start Guide
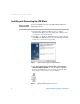
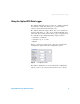
5 In the Communication panel, configure the LCR meter’s
communication settings.
i Select Auto (Figure 5) to allow the Agilent GUI Data
Logger to automatically search for a connected LCR
meter.
ii Select Manual (Figure 5) to manually update the Agilent
GUI Data Logger’s communication settings.
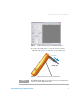
Select the communication Port that your LCR meter is
connected to. Clicking Update port will update the port
selections that are available on your PC.
Match the Baud Rate, Parity, and Data Bits settings
(Figure 5) to the settings of the connected LCR meter.
Figure 5 Communication panel
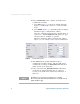
6 Click Connect. If the Agilent GUI Data Logger’s
communication settings matches with the LCR meter’s
communication settings, the Meter Connected notification
will be shown in the status bar.
7 If the connection fails (Meter Disconnected notification),
check that the U5481A IR- USB cable is connected
securely to the LCR meter and that the LCR meter is
turned on.
NOTE
The RS232 port is not meant for hot plugging or hot swapping.
Disconnecting the U5481A IR-USB cable when it is in use will crash the
Agilent GUI Data Logger.