
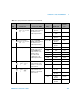
Technical data
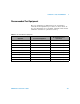


140 U1401A User’s and Service Guide
7 Performance Tests and Calibration
Output calibration
1 Set the slide switch to the M/S position.
2 Allow the instrument to warm up for 10 minutes before
performing calibration.
3 To enter the calibration mode, press and for
more than one second. The primary display will indicate
“CHEEP”.
4 Press to enter the input calibration mode.
5 Turn the rotary switch to any one of the “Current
Input/Voltage Output” positions, and press SHIFT for more
than one second to enter the output calibration mode.
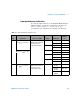
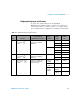
CAL-0 & CAL-1
In the output calibration mode, the primary and secondary
display will show “CAL- 0” and “- rdy- ” respectively.
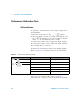
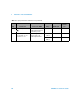
Connect the output terminals to a multimeter (refer to
Table 7- 1 on page 131 for the recommended test
equipment).
• CAL-0:
1 Press OUTPUT. The primary and secondary displays
show “CAL- 0” and “00000” respectively.
2 Wait until the instrument reading becomes stable, then
record the value.
• CAL-1:
1 Press MODE. The primary and secondary displays show
“CAL- 1” and “- rdy” respectively.
2 Press OUTPUT. The primary and secondary displays
show “CAL- 1” and “00000” respectively.
3 Press or to adjust the output voltage until the
reading on the meter is the same as the CAL-0 value
recorded above.
4 Press MODE to finish the CAL-0 and CAL-1 calibration.
5
6