
User`s guide

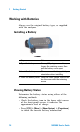


Table Of Contents
- Overview
- Getting Started
- System Setting
- Making Measurements
- Measuring Multiple Signals
- Measuring a Low-Level Signal
- Improving Frequency Resolution and Accuracy
- Making Distortion Measurements
- One-button Power Measurement
- Making a Stimulus Response Transmission Measurement
- Measuring Stop Band Attenuation of a Low-pass Filter
- Making a Reflection Calibration Measurement
- Measuring Return Loss Using the Reflection Calibration Routine
- Making an Average Power Measurement
- Key Reference
- SCPI Command Reference
- Error Messages
- Menu Map

Getting Started 1
N9340A User’s Guide 23
Some Helpful Tips
Performing a time-base calibration
The N9340A provides a manual calibration function
to calibrate the time base.
The analyzer should warm up for approximately 30
minutes before calibration.
Use a BNC cable to connect a 10 MHz reference
signal to the EXT TRIG IN connector of your N9340A,
then press [SYS] > {More (2 of 3)} > {Calibration} > {Time
Base} to initiate a calibration.
Selecting a preset type
The N9340A has two Preset options. Power On Pre-
set, and the Preset hardkey function. Each can be
defined by the user using the System menu. The
analyzer has two types of preset setting for you to
choose from:
• Default Restores the analyzer to its
factory- defined setting. The factory default
settings can be found, “Factory Default
Settings" on page 39
• User
Restores the analyzer to a user-defined setting.
See “Saving a User- defined Preset" on page 23.
Saving a User-defined Preset
If you frequently use system settings that are not
the factory defaults, refer to the following steps to
create a user- defined system settings that can be
easily recalled at the power up state:
1 Set analyzer parameters by the knob, the arrow
keys or the numeric keypad.
NOTE
The Analyzer will always use the factory-default settings
when powering on.