
User`s guide

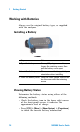


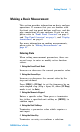


Table Of Contents
- Overview
- Getting Started
- System Setting
- Making Measurements
- Measuring Multiple Signals
- Measuring a Low-Level Signal
- Improving Frequency Resolution and Accuracy
- Making Distortion Measurements
- One-button Power Measurement
- Making a Stimulus Response Transmission Measurement
- Measuring Stop Band Attenuation of a Low-pass Filter
- Making a Reflection Calibration Measurement
- Measuring Return Loss Using the Reflection Calibration Routine
- Making an Average Power Measurement
- Key Reference
- SCPI Command Reference
- Error Messages
- Menu Map
Getting Started 1
N9340A User’s Guide 21
Making a Basic Measurement
This section provides information on basic analyzer
operations. It assumes that you are familiar with
the front and top panel buttons and keys, and dis-
play annotations of your analyzer. If you are not,
please refer to “Front Panel Overview" on page 4
and “Top Panel Overview" on page 5, and “Display
Annotations" on page 6
For more information on making measurements,
please refer to “Making Measurements" on
page 41”.
Entering Data
When setting measurement parameters, there are
several ways to enter or modify active function
values:
1 Using the Front Panel Knob
Increases or decreases the current parameter value.
2 Using the Arrow Keys
Increases or decreases the current value by the
step unit defined.
Press [FREQ] > {CF Step} to set the frequency by an
auto- coupled step (Step = Span/10, when {CF Step}
mode is set to Auto).
3 Using the Numeric Keypad
Enters a specific value. Then press a terminator
key (either a specified unit softkey or [ENTER]) to
confirm input.
4 Using the Unit Softkeys
Terminates a parameter value which requires a
unit input.
5 Using the Enter Key
Terminates an entry or confirms a selection.