
User`s guide

Getting Started 2
N9340B User’s Guide 21
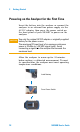
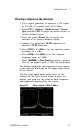
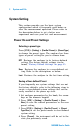
Viewing a Signal on the Analyzer
1 Use a signal generator to generate a CW signal
of 1.0 GHz, at a power level of 0.0 dBm.
2 Press [SYS] > {Setting} > {PwrOn/Preset} > {Preset
Typ e} and select DFT to toggle the preset setting to
factory- defined status.
3 Press the green [Preset] key to restore the
analyzer to its factory- defined setting.
4 Connect the generator’s RF OUT connector to
analyzer’s RF IN connector.
5 Press [FREQ] > 1 > {GHz} to set the analyzer center
frequency to 1 GHz.
6 Press [SPAN] > 5 > {MHz} to set the analyzer
frequency span to 5 MHz.
7 Press [MARKER] > {Peak Search} to place a marker
(M1) at the highest peak (1 GHz) on the display.
The Marker amplitude and frequency values appear
in the function block and in the upper- right corner
of the screen.
Use the front- panel knob, arrow keys, or the
softkeys in the Peak Search menu to move the
marker and read out the value of both frequency
and amplitude displayed on the screen.
Figure 2-1 View a signal (1 GHz, 0 dBm)