
Technical data


Hub Hi-Speed Tests 4
Notes on USB Electrical Compliance Testing 121
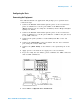
Configuring the Tests
Connecting the Equipment
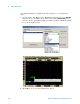
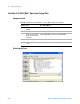
The USB automated test application will prompt you to perform these
connection steps:
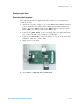
1 Connect the E2697A with 10073C passive probe or the 1156A active
probe on Channel 2 to the D- pin at TP2 of the E2649- 66401
(E2645- 66507 if you are using the old fixture) Device Hi- Speed Signal
Quality test fixture.
2 Connect the E2697A with 10073C passive probe or the 1156A active
probe on Channel 3 to the D+ pin at TP2. D+ on TP2 is the pin closest
to the USB connector.
3 Connect both probe grounds to leads COM (leads TP5 on the old
fixture).
4 Connect the [INIT PORT] of the test fixture into the host controller
port, using the 5- meter USB cable.
5 Connect the [TEST PORT] on the fixture to the upstream port of the
hub.
6 Apply power to the hub. Do not apply 5V to the test fixture.
7 If you are using the new fixture, please terminate the SMA connectors
with 50 Ohm terminators.
8 Check I have completed these instructions.