
User`s guide


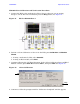
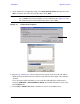
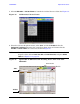
Table Of Contents
- U3042AE12
- Title Page
- TOC
- Introduction
- Description
- Available Options
- Verifying the Shipment
- General Specifications
- Typical Reflection Tracking
- Front and Rear Panel Features
- System Setup with N5230A/C
- Controlling the Test Set with N5230A
- System Setup with N5242A
- Controlling the Test Set with N5242A or N5230C
- DUT Control Lines
- Test Set I/O Interface Commands
- Operational Check
- Troubleshooting Operational Check Failures
- Service Information
- Theory of Operation
- RF Switch Components
- S100 - Source to Ports (1, 5, 9 and 13)
- S200 - Source to Ports (2, 6, 10 and 14)
- S300 - Source to Ports (3, 7, 11 and 15)
- S400 - Source to Ports (4, 8, 12 and 16)
- S101 - Receiver to Ports (1, 5, 9 and 13)
- S201 - Receiver to Ports (2, 6, 10 and 14)
- S301 - Receiver to Ports (3, 7, 11 and 15)
- S401 - Receiver to Ports (4, 8, 12 and 16)
- RF Coupler Components
- System Block Diagram
- Safety and Regulatory Information
- Electrostatic Discharge Protection
- Contacting Agilent

68 User’s Guide
U3042AE12 Operational Check
Operational Check Procedure
The sequence of this procedure is very important and must be followed or the performance
accuracy and results may vary from the reference plots provided. Ensure that the test set
is not connected to the PNA if you are performing a PNA Operator’s Check. The PNA will
indicate false failures if the test set is connected.
Preparing the N5230A
1. Connect the Test Set to the N5230A 4-Port PNA using the interconnect cables as shown
in Figure 50 on page 69 and Table 10 on page 16.
2. Turn On the Test Set.
3. On the PNA, press Calibration > Cal Sets. Delete or Rename any Cal Sets titled “999.1”
thru “999.16” (16-Port), although it is unlikely that you will find Cal Sets with these
names.
4. Verify that the PNA is in 16-Port mode. Refer to the bottom of Figure 55 on page 72, or
select Trace > New Trace.
a. If only four S-Parameters are listed, press System > Configure > Multiport
Capability. On the Multiport Restart dialog, select Restart as multiport PNA with
this test set. Select U3042AE12 (16-Port).
5. Press System > Preset.
6. Verify that the [Stop Frequency] is set to the maximum of the PNA and test set.
7. Verify that the [Start Frequency] is set to [10 MHz]. If not, press Channel > Start/Stop
and enter [10 MHz].
8. Verify that the [Power] is to set to [−8 dBm]. If not, press [Power] > Power Level and
enter [−8 dBm].
9. Select Sweep > IF Bandwidth > 100 Hz.
10.Select Sweep > Number of Points > 401.
11.Connect the ECal module to the PNA-L USB port on the front or rear panel, refer to
Figure 50 on page 69. This procedure assumes you are using a ECal. If you are not, see
“N5230A 1-Port Calibration and Verification Procedure”, step 2.