
- AGILE USER'S MANUAL Printers N-Series


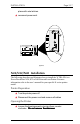
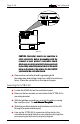
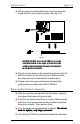

Table Of Contents
- TABLE OF CONTENTS
- Copyright Information
- Release Notes
- FCC/DOC Statement
- INTRODUCTION
- General Information
- Features and Options
- Specifications
- Printers Supported
- Port Specifications
- Throughput
- Resource Storage Space
- Firmware Upgrades
- Product Support
- INSTALLATION
- General Information
- Prior to Installation
- Selecting a Location
- Electrical Requirements
- Operating Environment
- Unpacking
- Package Contents
- N17 Installation
- Printer Preparation
- Opening the Printer
- Inserting the X/TRA XLi
- Returning the Printer to Operation
- N24/N32/N40 Installation
- Printer Preparation
- Opening the Printer
- Inserting the X/TRA XLi
- Returning the Printer to Operation
- Connections
- X/TRA XLi Connection to Parallel Input
- Connection Test
- Troubleshooting
- If Printer does not Start
- If the Printer does not Return a Status Sheet
- INTRODUCTION TO XES
- General Information
- X/TRA XLi XES Features and Specifications
- Key Benefits
- Printers Supported
- Printer Emulation
- Forms and Graphics Support
- Font Support
- Font Storage
- Page Conversion Methods
- Configuration
- Diagnostics
- XES COMMANDS
- General Information
- User-Defined Keys
- Selecting a UDK
- Emulation Change
- XES Command Format
- Two Types of Escape Sequences
- Job Control Commands
- Non-Job Control Commands
- Line Endings
- Configuration/Status Page
- Optional Comment
- Job Boundary Commands
- Print Job
- Print Job (Mixed Orientation)
- Reset
- Miscellaneous Commands
- Print Multiple Copies (Collated)
- Print Multiple Copies (Non-Collated)
- Paper Tray
- Output Tray
- Offset
- Duplex Start
- Duplex Invert Start
- Duplex Stop
- Duplex Side Select
- Comment
- Operator Text Message
- Font Commands
- Font Load
- Font Unload
- Font Add
- Font Delete
- Font ID Assignment
- Font Change
- Page Formatting Commands
- Units - 1/60"
- Units - 1/300"
- Margins
- Margin Top
- Margin Bottom
- Margin Left
- Margin Right
- Tabs Horizontal
- Tabs Clear Horizontal
- Tabs Vertical
- Tabs Clear Vertical
- Justification Start
- Justification Stop
- Justification Unlimited
- Center
- Line Spacing
- Line Spacing Absolute
- Character Spacing Absolute
- Forms Creation Commands
- Baseline Placement Absolute
- Text Placement Absolute
- Text Placement Relative
- Line Draw (X or Y)
- Document Enhancement Commands
- Bold Start
- Bold Stop
- Overstrike Start
- Overstrike Stop
- Subscript Start
- Superscript Start
- Sub/Superscript Stop
- Underline Start
- Underline Stop
- Merge Page Load
- Merge Page Unload
- Form ID Assignment
- Form Merge Start
- Cycleforms
- Form Merge Stop
- Page Merge Start
- Page Merge Stop
- Graphic Window
- Graphic Delete
- Graphic Window Repeat
- Graphic Line
- Graphic Arc
- Graphic Box
- Graphic Pie Chart
- Character Reassignment
- Load Translation Table
- Language
- Data Monitor
- Contol Codes
- XTRAEDIT CONFIGURATION
- General Information
- Getting Started
- Loading XTRAEDIT
- About XTRAEDIT
- Select Port
- XTRAEDIT Main Screen
- Keyboard Commands
- F10=Menu
- Esc=Cancel/Previous Menu
- Enter=OK/Select Item
- Alt-X=Exit
- F1=Help
- Arrow and Tab Keys
- Other Keyboard Commands
- File Menu
- Select Port
- XLI Resources Directory
- Exit - Alt-X
- Configure Menu
- Select Configuration to Edit
- Change Default Configuration
- Text Generation
- Font Selection
- Font Rotation
- Language
- Character Set
- Line Spacing
- Absolute Line Spacing
- Justification
- Printer Setup
- Input Tray Selection
- Input Paper Size
- Input Tray Map
- Output Tray Selection
- Output Tray Map
- Two-up Printing
- Source Code
- Duplex
- Page Length (Portrait, Landscape)
- Size Correction
- Top Offset
- Left Offset
- Minimum Top Coordinate
- Minimum Left Coordinate
- Margins (Portrait, Landscape)
- Top Margin
- Bottom Margin
- Left Margin
- Right Margin
- Tabs (Portrait, Landscape)
- Other Options
- Emulation Mode
- Line End
- Units of Measure
- Uppercase Commands
- UDK Character
- Job Timeout
- Job Sheet
- Error Level
- Undo Settings - Alt-U
- Install Settings Now - Alt-I
- Install As New Configuration
- Delete Configuration
- Resources Menu
- View Installed Fonts
- Load Font
- Delete Font
- Non-Shrinkable Fonts
- Load Resources File
- Command Line Interface
- Save Resources to File
- Pack XLI Memory
- Preferences Menu
- Measurement Units for Entries
- Confirm Before Updating XLI
- Help Menu
- Contents
- About

User’s ManualPage 2-16
figure 2.2
CAUTION: DO NOT press the X/TRA XLi on to the
controller board at an angle, or interface pins
could be bent, damaging the unit and causing it
to not function properly.
s Align the screw holes on the mounting bracket of the XLi
with the notches on the interface port. Make sure the
mounting bracket is flush with the interface port.
s Fasten mounting screws to the printer through the
guiding holes on either side of the X/TRA XLi.
Returning the Printer to Operation
s Slide the controller board back into the printer, aligning
the edge of the board in the guide rails
s Push the controller board firmly into place. Make certain
that there is no space between the controller board and
the printer chassis. They must be flush.
s Turn the thumbscrews clockwise to tighten.
Do not useDo not use
Do not useDo not use
Do not use
tools to tighten, only finger pressuretools to tighten, only finger pressure
tools to tighten, only finger pressuretools to tighten, only finger pressure
tools to tighten, only finger pressure
.
s Connect the X/TRA XLi parallel interface to the standard
Centronics parallel connection on the printer. Lock into