
- AGILE USER'S MANUAL Printers N-Series


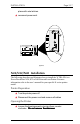
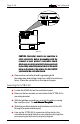
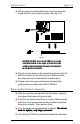

Table Of Contents
- TABLE OF CONTENTS
- Copyright Information
- Release Notes
- FCC/DOC Statement
- INTRODUCTION
- General Information
- Features and Options
- Specifications
- Printers Supported
- Port Specifications
- Throughput
- Resource Storage Space
- Firmware Upgrades
- Product Support
- INSTALLATION
- General Information
- Prior to Installation
- Selecting a Location
- Electrical Requirements
- Operating Environment
- Unpacking
- Package Contents
- N17 Installation
- Printer Preparation
- Opening the Printer
- Inserting the X/TRA XLi
- Returning the Printer to Operation
- N24/N32/N40 Installation
- Printer Preparation
- Opening the Printer
- Inserting the X/TRA XLi
- Returning the Printer to Operation
- Connections
- X/TRA XLi Connection to Parallel Input
- Connection Test
- Troubleshooting
- If Printer does not Start
- If the Printer does not Return a Status Sheet
- INTRODUCTION TO XES
- General Information
- X/TRA XLi XES Features and Specifications
- Key Benefits
- Printers Supported
- Printer Emulation
- Forms and Graphics Support
- Font Support
- Font Storage
- Page Conversion Methods
- Configuration
- Diagnostics
- XES COMMANDS
- General Information
- User-Defined Keys
- Selecting a UDK
- Emulation Change
- XES Command Format
- Two Types of Escape Sequences
- Job Control Commands
- Non-Job Control Commands
- Line Endings
- Configuration/Status Page
- Optional Comment
- Job Boundary Commands
- Print Job
- Print Job (Mixed Orientation)
- Reset
- Miscellaneous Commands
- Print Multiple Copies (Collated)
- Print Multiple Copies (Non-Collated)
- Paper Tray
- Output Tray
- Offset
- Duplex Start
- Duplex Invert Start
- Duplex Stop
- Duplex Side Select
- Comment
- Operator Text Message
- Font Commands
- Font Load
- Font Unload
- Font Add
- Font Delete
- Font ID Assignment
- Font Change
- Page Formatting Commands
- Units - 1/60"
- Units - 1/300"
- Margins
- Margin Top
- Margin Bottom
- Margin Left
- Margin Right
- Tabs Horizontal
- Tabs Clear Horizontal
- Tabs Vertical
- Tabs Clear Vertical
- Justification Start
- Justification Stop
- Justification Unlimited
- Center
- Line Spacing
- Line Spacing Absolute
- Character Spacing Absolute
- Forms Creation Commands
- Baseline Placement Absolute
- Text Placement Absolute
- Text Placement Relative
- Line Draw (X or Y)
- Document Enhancement Commands
- Bold Start
- Bold Stop
- Overstrike Start
- Overstrike Stop
- Subscript Start
- Superscript Start
- Sub/Superscript Stop
- Underline Start
- Underline Stop
- Merge Page Load
- Merge Page Unload
- Form ID Assignment
- Form Merge Start
- Cycleforms
- Form Merge Stop
- Page Merge Start
- Page Merge Stop
- Graphic Window
- Graphic Delete
- Graphic Window Repeat
- Graphic Line
- Graphic Arc
- Graphic Box
- Graphic Pie Chart
- Character Reassignment
- Load Translation Table
- Language
- Data Monitor
- Contol Codes
- XTRAEDIT CONFIGURATION
- General Information
- Getting Started
- Loading XTRAEDIT
- About XTRAEDIT
- Select Port
- XTRAEDIT Main Screen
- Keyboard Commands
- F10=Menu
- Esc=Cancel/Previous Menu
- Enter=OK/Select Item
- Alt-X=Exit
- F1=Help
- Arrow and Tab Keys
- Other Keyboard Commands
- File Menu
- Select Port
- XLI Resources Directory
- Exit - Alt-X
- Configure Menu
- Select Configuration to Edit
- Change Default Configuration
- Text Generation
- Font Selection
- Font Rotation
- Language
- Character Set
- Line Spacing
- Absolute Line Spacing
- Justification
- Printer Setup
- Input Tray Selection
- Input Paper Size
- Input Tray Map
- Output Tray Selection
- Output Tray Map
- Two-up Printing
- Source Code
- Duplex
- Page Length (Portrait, Landscape)
- Size Correction
- Top Offset
- Left Offset
- Minimum Top Coordinate
- Minimum Left Coordinate
- Margins (Portrait, Landscape)
- Top Margin
- Bottom Margin
- Left Margin
- Right Margin
- Tabs (Portrait, Landscape)
- Other Options
- Emulation Mode
- Line End
- Units of Measure
- Uppercase Commands
- UDK Character
- Job Timeout
- Job Sheet
- Error Level
- Undo Settings - Alt-U
- Install Settings Now - Alt-I
- Install As New Configuration
- Delete Configuration
- Resources Menu
- View Installed Fonts
- Load Font
- Delete Font
- Non-Shrinkable Fonts
- Load Resources File
- Command Line Interface
- Save Resources to File
- Pack XLI Memory
- Preferences Menu
- Measurement Units for Entries
- Confirm Before Updating XLI
- Help Menu
- Contents
- About
User’s ManualPage 2-14
humidity tolerances for the particular N-series printer in which it is installed.
Unpacking
After removing the X/TRA XLi from the shipping container, inspect the unit
for any damage in shipment. Immediately report any damage to the freight
carrier. Save the packing container. Do not remove the unit from its
antistatic enclosure until it is ready for installation.
Package Contents
Except when ordered otherwise, the X/TRA XLi includes the X/TRA XLi
internal protocol converter, this users manual, and an appropriate cable, as
ordered. Should any of these items be missing or damaged, contact an
AGILE sales representative.
N17 Installation
The following describes and illustrates how to install the X/TRA XLi in a
Xerox DocuPrint
®
N17 Network Laser Printer. For more information refer to
the users manual for your specific N-series printer model
Printer Preparation
s Turn the printer power off
s Disconnect the power cord and remove all cables
Opening the Printer
Use the following instructions to open the printer and refer to figure 2.1.
s Loosen the thumbscrews by turning them counter
clockwise.
Do not remove the thumbscrews.Do not remove the thumbscrews.
Do not remove the thumbscrews.Do not remove the thumbscrews.
Do not remove the thumbscrews.
CAUTION: Controller boards are sensitive to
static electricity. Before proceeding with the
removal of your printers controller board,
discharge any static electricity from your body
by touching something metal, such as the metal
plate on the back of the printer. Do this BEFORE
you handle the controller board.
s Remove the controller board by grasping both
thumbscrews and pulling toward you with firm and even
force.