
Technical data

N7280
N7280N7280
N7280-
--
-90034
9003490034
90034-
--
-
Rev. A
Rev. ARev. A
Rev. A
System
SystemSystem
System Installation and Verification
Installation and Verification Installation and Verification
Installation and Verification
23
2323
23
7
7 7
7 System Performance Verification Procedure
System Performance Verification ProcedureSystem Performance Verification Procedure
System Performance Verification Procedure
The following procedures should be closely followed to verify
proper system performance. These steps will verify that all
power levels are correct before full power is applied to all
assemblies.
1
11
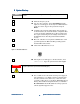
1 AC voltage check
a
aa
a After the site power (mains) is connected to the
PDU, unplug all subassembly AC power cords from
the side closest to the subassemblies, not the PDU
side.
b
bb
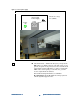
b Make sure all connectors are properly seated into
the PDU and power outlet boxes prior to turning on
the power, especially the connectors that attach to
the back of the PDU. System damage may occur if
all connectors are not properly seated.
c
cc
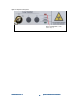
c Turn the PDU power on using the mains switch and
the enable switch on the rear of the PDU.
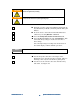
Voltage and current sufficient to cause severe shock or other bodily damage are present in this
assembly.
d
dd
d Check the AC voltage on each outlet using line
voltage safety precautions:
e
ee
e The PDU output voltage should be between 195
volts and 240 volts AC. (See Table 6 of Appendix A.)
If it is not:
Turn off mains switch from the system at the
facility circuit breaker.
Check the wiring into the PDU. Have the customer
electrician verify all wiring. Recheck AC voltage.
f
ff
f If the output voltage is in the range, turn power off
at the mains switch on the rear of the PDU.
g
gg
g Reconnect all subassembly power cords.
h
hh
h Verify the system controller power switch is off.
i
ii
i Check that all other subassemblies are in the on
state, so they will power up when the PDU is
switched on.
j
jj
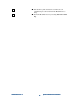
j Turn on the PDU mains switch. LEAVE the green
ON/OFF rocker switch in the OFF position.
2
22
2 System controller power up
a
aa
a Switch the monitor on.
b
bb
b Switch the IRP controllers on.
WARNING