
User`s guide
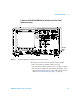
Front-Panel Controls 2
5000 Series Oscilloscope User’s Guide 55
To make a single acquisition
When you press the Single key it illuminates in yellow and the
oscilloscope starts the acquisition system, searching for the
trigger condition. When the trigger condition is met, the
captured waveform is displayed, the Single key is extinguished
and the Run/Stop key illuminates in red.
• Use the Single key to view single-shot events without
subsequent waveform data overwriting the display.
Use Single when you want the maximum sample rate and the
maximum memory depth for pan and zoom. (See “To pan and
zoom” on page 56)
1 Set the trigger mode to Normal (see “Trigger modes: Normal
and Auto” on page 92 for instructions).
This keeps the oscilloscope from automatically triggering
immediately.
2 If you are triggering on oscilloscope channel events, turn the
Trigger Level knob to the trigger threshold to a level that your
waveform will cross.
3 To begin a single acquisition, press the Single key.
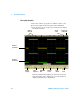
When you press Single, the display is cleared, the trigger
circuitry is armed, the Single key is illuminated yellow, and
the oscilloscope will wait until a trigger condition occurs
before it displays a waveform.
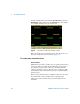
When the oscilloscope triggers, the single acquisition is
displayed and the oscilloscope is stopped (the Run/Stop key is
illuminated in red).
4 To acquire another waveform, press Single again.
Auto Trigger Mode and Single
In Auto trigger mode the oscilloscope will generate a trigger for
you if one is not found in the predetermined time (about 40 ms)
after you press Single. If you want to make a single acquisition
and you are not particularly interested in triggering the
acquisition (for example, if you are probing a DC level), set the