
User`s guide

48 5000 Series Oscilloscope User’s Guide
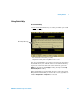
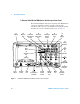
2 Front-Panel Controls
6. Channel On/Off Key Use this key to switch the channel on or
off, or to access the channel’s menu in the softkeys. There is one
Channel On/Off key for each channel. See “Using the
channels” on page 60.
7. Math Key The Math key provides access to FFT (Fast Fourier
Transform), multiply, subtract, differentiate, and integrate
functions. See “Math Functions” on page 155.
8. Vertical Sensitivity Use this knob to change the vertical
sensitivity (gain) of the channel. See “Using the channels” on
page 60.
9. AutoProbe Interface (When you connect a probe to the
oscilloscope, the AutoProbe Interface attempts to determine the
type of probe and set its parameters in the Probe menu
accordingly. See page 58.
10. Channel Input BNC Connector Attach the oscilloscope probe
or BNC cable to the BNC connector. This is the channel’s input
connector.
11. Label Key Press this key to access the Label menu, which
lets you enter labels to identify each trace on the oscilloscope
display. See page 74.
12. File Keys Press the File key to access file functions such as
save or recall a waveform or setup. Or press the Print key
(labeled “Quick Print” on older models) to print the waveform
from the display. See “Saving and Printing Data” on page 253.
13. Utility Key Press this key to access the Utility menu, which
lets you configure the oscilloscope’s I/O settings, printer
configuration, file explorer, service menu, and other options.
14. Trigger Controls These controls determine how the
oscilloscope triggers to capture data. See “Choosing Auto trigger
mode or Normal trigger mode” on page 56 and Chapter 3,
“Triggering the Oscilloscope,” starting on page 89.