
User`s guide


Getting Started 1
5000 Series Oscilloscope User’s Guide 25
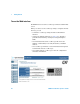
To establish a LAN connection
1 If the controller PC isn’t already connected to the local area
network (LAN), do that first.
2 Get the oscilloscope’s network parameters (hostname,
domain, IP address, subnet mask, gateway IP, DNS IP, etc.)
from your network administrator.
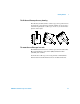
3 Connect the oscilloscope to the local area network (LAN) by
inserting the LAN cable into the “LAN” port on the rear
panel of the oscilloscope.
4 On the oscilloscope, ensure the controller interface is
enabled:
a Press the Utility key.
b Using the softkeys, press I/O and Control.
c Use the Entry knob to select “LAN”; then, press the Control
softkey again.
5 Configure the oscilloscope’s LAN interface:
a Press the Configure softkey until “LAN” is selected.
b Press the LAN Settings softkey.
c Use the Config softkey and the Entry knob to select DHCP,
AutoIP, or NetBIOS and associated options.
d Press the Addresses softkey. Use the Modify softkey (and
the other softkeys and the Entry knob) to enter the IP
Address, Subnet Mask, Gateway IP, and DNS IP values.
When you are done, press the return (up arrow) softkey.
e Press the Domain softkey. Use the Modify softkey (and the
other softkeys and the Entry knob) to enter the Host name
and the Domain name. When you are done, press the
return (up arrow) softkey.
f Press the Apply softkey to apply the changes.
NOTE
When you connect the oscilloscope to a LAN it is a good practice to limit
access to the oscilloscope by setting a password. By default, the
oscilloscope is not password protected. See page 32 to set a password.