
Technical data

28 Agilent Signal Generators Programming Guide
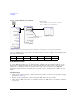
Using IO Interfaces
Using GPIB
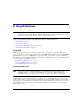
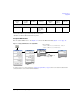
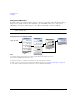
Figure 2-2 Setting the GPIB Address on the ESG/PSG
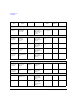
Connect a GPIB interface cable between the signal generator and the computer. (The following table
lists cable part numbers.)
Verify GPIB Functionality
To verify GPIB functionality, use the VISA Assistant, available with the Agilent IO Library or the
Getting Started Wizard available with the National Instrument IO Library. These utility programs
enable you to communicate with the signal generator and verify its operation over GPIB. For
information and instructions on running these programs, refer to the Help menu available in each
utility.
If You Have Problems
1. Verify that the signal generator’s address matches the address declared in the program (example
programs in Chapter 3).
2. Remove all other instruments connected through GPIB and rerun the program.
3. Verify that the GPIB card’s name or id number matches the GPIB name or id number configured
for your PC.
Model 10833A 10833B 10833C 10833D 10833F 10833G
Length 1 meter 2 meters 4 meters .5 meter 6 meters 8 meters
For details on each key, use the Key and Data Field Reference. For additional SCPI command information, refer to the SCPI Command Reference.
Default address: 19
Range: 0–30
SCPI commands:
:SYSTem:COMMunicate:GPIB:ADDRess <number>
:SYSTem:COMMunicate:GPIB:ADDRess?