
User`s guide

5-4) If you want to save the current calibration kit definition, press the Save key and save the definition to
your desired file. Saved calibration kit definition files can be recalled by pressing the Recall key.
NOTES
- If you save the calibration kit definition as “D:/Agilent/Trldata/Default.dat,” the file is handled as
the default definition file. The default definition file is automatically recalled when the macro starts.
- If you press the Default key, the calibration kit definition is set to the factory default setting (the
definition of the 85052C calibration kit).
5-5) Press the Close button to finish defining the calibration kit.
6. Performing calibration measurement
If the frequency ranges of match and line standards are correctly defined to cover the ENA’s measurement
frequency range, the red warning message “Press [Define CalKit] & Check Match/Line1-3” disappears and
the Thru, Reflection, and selected Match/Lines keys appear in the main control panel.
NOTES
- If the Thru, Reflection, and Match/Lines keys do not appear, go back to the calibration kit
definition menu and confirm that the frequency range definitions of match and lines are correctly
entered to cover the ENA’s measurement frequency range.
- Isolation calibration measurement is not available.
6-1) Press each of the Thru, Reflection, and Match/Lines keys in the main control panel, and then press each
calibration measurement key that appears in the User Menu area to perform the calibration measurements.
For example, if you perform 2-port TRL/LRM calibration between test ports 1 and 2 by using the Match,
Line1 and Line2 standards, perform the calibration measurements as follows:
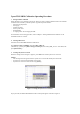
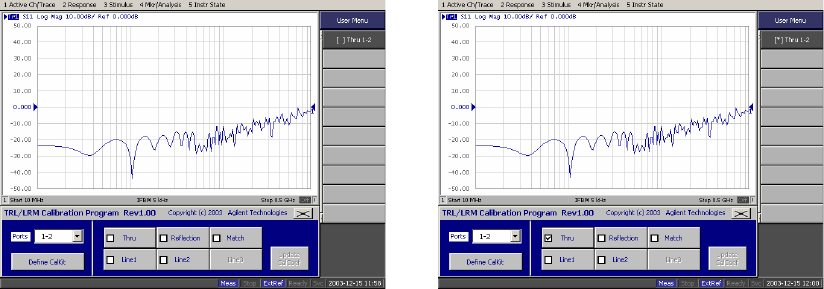
Through measurement:
- Press Thru.
- Make the through condition for the test ports 1 and 2, and press [ ]Thru 1-2. The through
measurement is performed, and an asterisk is indicated.
a) Press [ ]Thru 1-2 to perform the thru measurement. b) * indicates when the measurement complete.
Figure 5. Performing through calibration