
Technical data


2-6
Agilent E7501A Getting Started
Performing Acceptance Test Procedures
Test 2. AM Accuracy
Step 2.
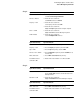
Agilent E7501A Summary Agilent E7501A Details
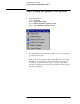
Reset 1. From the pull down View menu,
select Reset View Settings and Windows.
Reference = External 2. From the RF Source Control view,
select Reference and set it to External.
Frequency = 10 MHz 3. From the RF Source Control view,
select Frequency Units and set it to MHz.
4. From the RF Source Control view,
highlight the Frequency field and enter 10 using the keyboard.
Power = 0 dBm 5. From the RF Source Control view,
highlight the Power field and enter 0 using the keyboard.
AM = Enabled 6. From the Stimulus Parameters view,
select the AM tab.
7. On the AM tab,
select the Value field for AM Rate and enter 10000 (10 kHz).
8. From the RF Source Control view,
select the AM check box.
RF On = Enabled 9. From the RF Source Control view,
select the RF Output Enable check box.
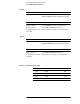
Agilent 8563E Summary Agilent 8563E Details
Preset 1. Press the green Preset front panel key.
Frequency = 10 MHz 2. Press the Frequency front panel key and enter 10 MHz.
Span = 100 kHz 3. Press the Span front panel key and enter 100 kHz.
Reference Level = +10 dBm 4. Press the Amplitude front panel key and enter +10 dBm; this sets
a reference level.
Marker, Peak Search 5. Press the Mkr and Peak Search front panel keys.
Marker Delta, Next Peak 6. Press the Marker Delta and Next Peak front panel keys.
Record Marker value for
10 MHz and 10 kHz Rate.
7. Enter the marker value in Table 2-2 for 10 MHz test frequency and
10 kHz Rate