
Technical data


1-10
Agilent E7501A Getting Started
Installation and Configuration
Step 4. Configuring Hardware/Software Assets
Step 4. Configuring Hardware/Software Assets
NOTE
If you ordered a preconfigured system, skip this step and proceed to
“Step 5. Starting the Agilent E7501A Software” on page 1-20.
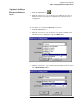
Understanding the
Asset Manager
Before using the Agilent E7501A arbitrary analog signal developer, you
must configure a Stimulus Server. Once configured and connected, the
Stimulus Server controls the hardware/software (which is a minimum of
one RF Source and zero or more Modulation Sources). It is used to generate
user specified AM, FM, and Pulse modulated signals.
A Stimulus Server is the
primary signal-generation
element in the Agilent E7501A
arbitrary analog signal
development system.
A Hardware Asset is any
piece of hardware (such as
an Agilent Technologies
E6432A microwave
synthesizer) that is
configured for system use.
An Asset Role is the general
category of a hardware asset.
(For example, some asset roles
are: Stimulus Server,
Power Meter,
Modulation Analyzer,
RF Source, Modulation Source,
Source Synchronizer,
Modulation Type, and
Frequency List Calculator.)
The Stimulus Server operates as follows:
Zero or more Stimulus Servers may be running on the same machine at
the same time.
More than one Stimulus Server may be pointing at the same set of
hardware assets, but only one Stimulus Server may be actively
controlling the hardware assets.
More than one Stimulus Server may be pointing at the same set of
hardware assets, but only one Stimulus Server may be actively
controlling the hardware assets.
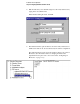
How to proceed:
1. “Starting the Asset Manager” on page 1-11.
2. “Selecting a Configuration” on page 1-12.
3. “Configuring an RF Source” on page 1-13.
4. “Configuring a Modulation Source” on page 1-15.
5. “(Optional) Configuring Other Available Assets” on page 1-16.
6. “(Optional) Adding a Hardware/Software Asset” on page 1-17
7. “(Optional) Removing a Hardware/Software Asset” on page 1-19
8. “Exiting Configuration” on page 1-19