
Installation guide


Special Configurations Setting Up ParBERT 43G
Agilent 81250 ParBERT Installation Guide, February 2002 63
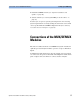
The graphic shows eight consecutive E4861A data generator/analyzer
modules with two frontends each.
Figure 41 Numbering of Connections
As the ports of the MUX/DEMUX modules are numbered, this drawing
makes it very simple to establish the connections correctly:
1 Connect the two cables of port #0 of the MUX/DEMUX module to the
upper frontend of the leftmost data generator/analyzer module.
Connect “normal” to “normal” and “inverted” to “inverted”.
2 Connect port #1 of the MUX/DEMUX module to the lower frontend of
the leftmost data generator/analyzer module.
3 Connect port #2 of the MUX/DEMUX module to the upper frontend of
the next data generator/analyzer module.
4 Follow that scheme until all ports of the MUX/DEMUX module are
connected.
Special Configurations
There may be situations where you need more than 16 data generators or
analyzers.
For example, you may need an extra generator for sourcing a clock pulse
to the device under test. Or, if you are testing a demultiplexer device with
built-in clock recovery circuits, you may need an extra analyzer for
conditioning the recovered clock signal.
Testing SFI-5 multiplexer and demultiplexer devices generally requires
more than 16 generator/analyzer channels at 2.7 Gbit/s. So this would
require more room than two VXI frames can provide.
In such cases it is recommended to add a third frame in the middle
between the pattern generators and the analyzers. This frame should
house the MUX and DEMUX modules.