
Installation guide


Setting Up ParBERT Modifying an Existing ParBERT System
44 Agilent 81250 ParBERT Installation Guide, February 2002
How to Remove a Module
To remove a module from the mainframe:
1 Shut down ParBERT.
CAUTION Some modules, particularly the E4861B modules, can reach a front
panel temperature of more than 50 °C. This is not unusual, because the
complete housing is used as a huge heat sink.
It may be wise to let the mainframe cool down before continuing.
2 Unplug all connections from the front of the module.
3 Using a 2-mm flathead screwdriver, remove the two screws at the top
and bottom of the front panel that hold the module in place.
4 Flip the module handles until the module moves.
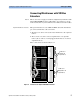
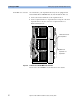
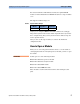
5 Pull the module out of the mainframe, as shown in Figure 23.
Figure 23 Removing a Module From the Mainframe
6 If you want to replace the previous module, insert the new module
now, as described under ”How to Add a Module” on page 44.
Otherwise, finish up as described under ”How to Proceed After
Changing the Hardware” on page 56.
How to Add a Module
Most ParBERT modules are one-slot, C-size VXI modules that are to be
plugged into the ParBERT mainframe.
To install a ParBERT module:
1 Shut down ParBERT.
2 Select an empty mainframe slot.
The module has to be added to a clockgroup. See ”What Makes up a
ParBERT System” on page 22 for information on setting up a
clockgroup.