
Installation guide


14 Chapter 3
Operation Verification
Checking the Maximum Leveled Power
• The current status of the self-test is: Incomplete. Not all tests have been run.
When the self- test is complete, one of the following messages will be displayed:
• The current status of the self-test is: Passed
• The current status of the self-test is: Failure. One or more tests have failed.
System diagnostics indicate this test as the root failure: xxx
The number of tests that passed and failed are displayed in the lower left- hand corner of the display.
If the signal generator fails only one test, the display shows the title of the failed test. If the signal
generator fails more than one test, the test number of the most significant failure is shown.
Self-Test Failure
If a self- test failure occurs, perform the following procedure:
1. Make sure all external cables, including GPIB, LAN, and RS- 232 cables, are disconnected from the
signal generator and perform the self- test again.
2. If the self- test continues to fail, send the signal generator to an Agilent service center for repair,
with a detailed description of the failed test(s) and any other error messages that appeared on
the display.
See “Returning a Signal Generator to Agilent Technologies” on page 11 for return instructions.
Checking the Maximum Leveled Power
Perform the following procedure to check the maximum leveled power.
1. Press
Preset.
2. Attach a 50Ω load to the RF OUTPUT. A power sensor, attenuator, or 50Ω termination is an
example of a 50Ω load.
3. Press
RF On/Off. The RF On annunciator is now displayed.
4. Press
Mod On/Off. The Mod Off annunciator is now displayed.
5. Press
Amplitude and enter a value from Table 3- 1 that is applicable to your instrument model and
option configuration.
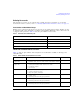
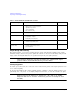
NOTE Some typical option configurations and their maximum output power limits are shown in
Table 3- 1. For the complete matrix of options or for the latest changes to specifications,
refer to the PSG data sheets either on the web at http:\\www.agilent.com\find\psg or on the
documentation CD that was shipped with your instrument.
6. If the signal generator is equipped with Option 007, press
Sweep /List > Sweep Type> Step > Configure Step
Sweep
.
If the signal generator is not equipped with Option 007, press
Sweep /List > Configure Step Sweep.
7. Press
Freq Start and enter the start frequency value listed in Table 3- 1 that corresponds to the
amplitude value entered in step 5.
8. Press
Freq Stop and enter the corresponding stop frequency listed in Table 3- 1.
9. Press
# Points and enter the number of corresponding points listed in Table 3- 1.