
Technical data


Chapter 1 35
Getting Started
Your First 15 Minutes with the E7495A/B
Getting Started
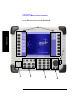
Number Description
1 Power button. Powers the test set on and off, and puts it into standby
mode.
• To power on, press the power button. When the test set is on, the
right LED is lit.
• To put into standby mode while the power is on, press the button
for about 1 second. In standby mode—which conserves the battery
and provides quicker startup—the left LED is lit. For more
information about the power button states, refer to “Practice Using
the Three-way Power Button” on page 37.
• To power off, press the button and hold down until you see both
LEDs go out. This takes approximately 5 seconds.
2•Preset. Recalls the power-up state, applying Agilent defaults or the
defaults you define using the Save State button.
• Brightness.Changes the brightness of the display in four
increments. To increase or decrease the brightness, press the button
repeatedly.
• Help. Displays online help.
• ESC/Lcl. Stops the active function and clears the active function
text from the display. Pressing ESC/Lcl after the test set has been
placed in remote mode switches to local mode and enables
front-panel control.
• Mode. Displays a menu of measurement modes.
• Save Data. Saves the non-trace measurement data to either a
PCMCIA or CompactFlash card.
• Save State. Saves the state of all measurement parameters to
non-volatile memory in the test set. You can save multiple states,
each with its own name.
• System. Displays menu of non-measurement operations including
configuration, system status updates, data manipulation, and basic
system functions testing.
• Print Screen. Prints the current screen image to either a PCMCIA
or CompactFlash card.
• Recall State. Recalls the state of all measurement parameters you
saved in non-volatile memory using the Save State button.
3 Numeric keypad. Used for entry of values for many test parameters.