
User`s guide

Agilent PXT Wireless Communications Test Set
User’s Guide
47
2. Select Func > UE Power Control = CLPC
. (Selecting CLPC automatically sets Atten > Attenuation
= Adaptive
.)
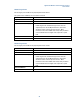
3. Set the PUSCH Target Power to +23 dBm.
Power control commands are sent to the UE, which changes its power level. The PXT tracks these
power changes when Attenuation is set to Adaptive.
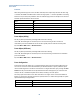
4. Note the PUCCH
value. It is now set between +23 dBm and +3 dBm because PUSCH and PUCCH
cannot be separated by more than 20 dB (PXT limitation).
It is not possible to change the PUCCH value to a limit outside of +/-20 dBm from the PUSCH
value, so if you wish to set PUCCH to -30dBm, the PUSCH value must first be set to -10dB or lower.
The PUSCH value always takes precedence.
To see the PUCCH you must set Mode Setup > More > PHY Settings > UL Resource Allocation >
Resource Allocation Mode = Auto
and set Func > DTCH Test = On or send End to End Data to the device.
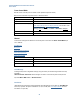
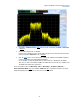
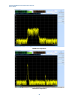
PUSCH and PUCCH power adjustments are shown in the screenshots below.