
User`s guide


Agilent PXT Wireless Communications Test Set
User’s Guide
157
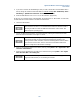
4. If you want to measure the UE PUSCH signal, then you need to ask the UE to transmit PUSCH. This is
done by setting the UL Resource Allocation Mode to Fixed Mac Padding
: BSE > MODE Setup > More >
PHY Settings > Uplink Resource Allocation > Resource Allocation Mode
5. Ensure the OVF indicator is not on. If it is on, set the attenuation, appropriately.
At this point, you can either perform “Real Time VSA” live measurements or “Record VSA”. For Live mode,
the PXT sends 22 ms worth of IQ data to the VSA for measurements.
6. Launch the VSA software.
It is recommended that you launch the VSA software from the Start menu of the VSA
host PC and then connect to it via the VSA/PXT Communicator software instead of
launching the VSA from within the VSA/PXT Communicator user-interface. This
method improves operating speed.
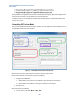
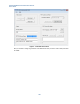
7. Connect the VSA/PXT Communicator to the VSA software by selecting the Launch/Connect VSA
button as shown circled in blue on the Figure 4-1, above.
If the VSA is already running on the PC (preferred sequence), selecting
Launch/Connect VSA connects the VSA/PXT Communication software to the
running instance of VSA: otherwise, it launches the VSA application and then makes
the connection. In both cases, after the connection the PXT/VSA Communicator
software configures the VSA software accordingly.
8. Verify (or set) the VSA IP address on the PXT key menu by pressing Mode > SA > Agilent VSA > Real
Time VSA > VSA IP Address.
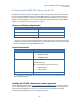
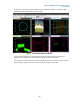
9. Send the capture uplink IQ data to the VSA for the measurements by pressing Mode > SA > Agilent
VSA > Real Time VSA > Start sending data.
The server must be running. See PXT/VSA Server Status as shown in graphic below.
A green bar indicates that you are refreshing the statistics.