
Technical data


16 Getting Started Guide
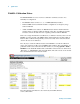
1 Quick-Start
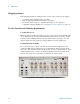
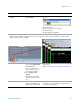
10 Generate and view a
signal
a Press
Input/Output, RF
Input, RF Input Port,
RFIO 1
.
b Press
Input/Output, More,
RF Output & Test Set
Config
, RF Output Port,
RFIO 2
.
c Press
AMPTD Y Scale, Ref
Value
, 10, dBm.
d Press
FREQ, Center Freq,
2.4, GHz.
e Press
SPAN X Scale,
Span, 8, MHz.
f Press
Source, Frequency,
2.4, GHz.
g Press
Source, RF Output,
On.
h Press
Source, Amplitude,
RF Power, 0, dBm.
• Select RFIO 1 as the input port
• Select RFIO 2 as the output port.
• Set the amplitude reference to 10 dBm
• Set the analyzer center frequency to 2.4 GHz.
• Set the analyzer span to 8 MHz.
• Set the source frequency to 2.4 GHz.
• Set the source RF output to On.
• Set the source amplitude to 0 dBm.
• To ensure accurate power levels from the source, see
“Alignments" on page 17.
The 2.4 GHz signal appears on the display.
Steps Actions Notes