
Technical data


Quick-Start 1
Getting Started Guide 15
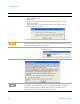
6 Disable the Anti-Virus
message
a Select the check box and
click
Continue.
• Messages similar to the following continue to
appears:
• The system reboots.
• Several required processes continue.
• The system reboots.
• The XSA application initializes
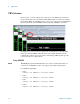
7 Separate instances of the application are launched for each TRX installed in the PXI rack (they are identified as
“TRX1” through “TRX4” in the upper left corner of the application window). The verification procedures which
follow should be done for all TRXs.
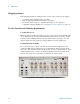
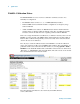
8 Verify the installation a From the mouse right-click
menu, select
Utility, Virtual
Front Panel
. (All
key-presses that follow
refer to the keys shown on
the Virtual Front Panel.)
b Press
System, Show,
System.
c Verify that the purchased
application(s) appear in the
list.
• If you require further assistance, contact the Agilent
support team.
Online assistance: http://www.agilent.com/find/assist
9 Attach a loopback cable a Use an RF cable to connect
the front panel RFIO 1 and
RFIO 2 ports for this TRX.
• The purpose is to use a loopback cable to verify that
the test set’s source can generate a signal and the test
set’s analyzer can measure it.
Steps Actions Notes