
Technical data


86 Chapter 6
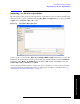
Front Panel Sequence Setup
Front panel source sequence setup
Front Panel Sequence Setup
Step 8. Return to the Radio Setup menu, and select the Radio Band Link (Downlink or Uplink.)
Step 9. Return to the
List Sequencer Setup menu, and set the channel or frequency.
If you have set the radio standard and radio band to values other than “None”, use the
Channel Softkey to select an appropriate channel number (the test set uses the radio standard,
radio band, and channel settings to determine frequency).
Or, if you have set the radio standard or radio band as “None”, use the
Frequency softkey to
set the frequency directly.
Step 10. In the
List Sequencer Setup menu, set the Power in dBm.
Step 11. In the
List Sequencer Setup menu, select the Waveform for the source step (use the
submenu that is displayed to select a waveform from memory, continue playing the waveform
from the previous step in the sequence, generate a CW tone, or select “Off”).
Step 12. In the
List Sequencer Setup menu, set the Step Duration for the source step.
Step 13. In the
List Sequencer Setup menu, use the Output Trigger softkey to select “On” or “Off”.
Step 14. In the
List Sequencer Setup menu, use the Multiport Adptr Output Port softkey to select
“List” or “Fixed”.
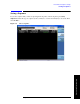
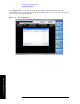
The values you select are updated on the display as you change them.
To start the sequence, press
Source, List Sequencer and set the Sequencer button to “On”. Then select
Initiate Sequence.