
Technical data


Chapter 6 79
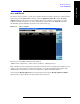
Front Panel Sequence Setup
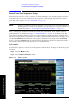
Front Panel List Sequencer Setup
Front Panel Sequence Setup
Test set parameter setup
The mechanical attenuation settings should be set up before running the sequence. To set this parameter
proceed as follows:
• Press
AMPTD Y Scale hardkey followed by Attenuation, Mech Atten softkeys and set the
mechanical attenuation as required.
Note that the Internal Preamp settings are controlled by the Acquisition’s Instrument Gain parameter.
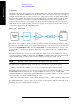
Input/Output setup
There are four connectors on the front panel that need to be configured as input and output ports to be
used by the list sequencers:
Step 1. To configure the input port, press the
Input/Output hardkey and then the RF Output & Test
Set Config, Multiport Adapter, Input Port
softkeys, and select either one of the MPA RFIO
ports as an input (
RFIO 0 through RFIO 7) or OFF if the RF IN port is to be used as the input
(in which case the
Multiport Adapter key on the Multiport Adapter menu should have Off
selected).
Step 2. To configure the output port, press the
Input/Output hardkey and then the RF Output & Test
Set Config, Multiport Adapter, Output Port
softkeys, and select the desired MPA RFIO
ports as outputs (
RFIO 0 through RFIO 7) by toggling the relevant softkeys On or Off. To use
the RF OUT port, set all of the MPA RFIO ports Off (in which case the
Multiport Adapter
key on the
Multiport Adapter menu should have Off selected).
Corrections
At this point it is useful to apply any amplitude corrections to the signals at the front panel ports. To
select the RF port to which you want to apply corrections, take the following steps:
Step 1. Press
Input/Output hardkey and then the Corrections softkeys (assuming that RF IN and RF
OUT ports are being used). If the MPA RFIO ports are being used, press the
Input/Output
hardkey and then the
RF Output & Test Set Config, Multiport Adapter, Corrections
softkeys.
Step 2. In the
Corrections menu, select Properties.
Step 3. In the
Properties menu, select Multiport Adpt RF Port Port and select the port to which to
apply the selected Correction.
Step 4. In the
Corrections menu, set Apply Corrections to On.
To apply more than one set of corrections to the chosen port, change the
selected Correction in the
Corrections menu (Correction 1 to 6) and then, select Corrections, On in the Corrections menu. Up to
six sets of corrections can be applied to a signal.