
Technical data


Chapter 11 161
Example Test Scenarios
Verification Example
Example Test Scenarios
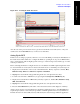
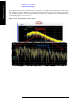
Figure 11-15. Creating the ILPC Waveform
As in the case of the previous waveform, we give the waveform file a new name (ILPC.wfm), and
download it to the D:\NVARB directory on the test set’s hard drive.
Setting Up the DUT
In this test we are using a proprietary software tool to control the DUT, provided by the manufacturer of
the mobile device. This enables us to configure the DUT, its operating mode, its ports, its RF channels,
and so on. The details of this are highly specific to the type of device being tested, and the type of control
software provided for it.
Before activating the DUT, we configure the test set to modulate its downlink output using the first of the
two waveform files we created (the one that sets the mobile device to maximum power). The steps are:
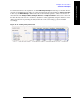
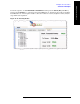
1. Display the waveform files on the test set’s internal hard drive. The key sequence is:
Source, More,
Modulation Setup, ARB, Select Waveform, Segments on Hard Disk.
2. Highlight the waveform file All_Up.wfm using the mouse or the up/down arrow keys.
3. Load the waveform file to ARB memory by pressing the Load Segment to ARB Memory key.
4. Display the waveform files in ARB memory. The key sequence is:
Source, More, Modulation Setup,
ARB, Select Waveform.
5. Highlight the waveform file All_Up.wfm using the mouse or the up/down arrow keys.
6. Press the
Select Waveform key. The name of the selected waveform is then displayed on this key.
At this point we use the control application for the DUT to instruct the device to start W-CDMA and
acquire the pilot (that is, receive and sync up with the downlink signal from the test set). When those
instructions have been successfully issued (as indicated by the status messages which the application