
User`s guide


8 User’s Guide
Signal Studio for WiMAX E4438C Option H13
Using the Software
Step 3: Configure the Signal Generator Settings
a. Configure the ESG’s frequency, amplitude and arbitrary waveform playback
parameters in the Signal Generator Settings pane as desired. Note that the amplitude
refers to the average power level of the burst excluding the preamble. The preamble
power level is defined in the standard to be 3 dB higher than the level of the rest of the
burst.
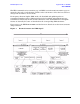
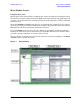
Step 4: Configure the Frame Structure
a. Click Frame in the tree view. The frame view displays the frame structure, with the
downlink subframe on the top half and the uplink subframe on the bottom half.
Typically you will set up either the downlink or the uplink only, although the software
allows you to put both in one waveform. You can also click the Frame button in the
toolbar just below the menu bar to show (or hide) a graphical view of the frame layout.
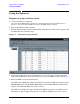
b. A preamble has been inserted into the downlink subframe by default. Click Add FCH or
Add Burst. The new FCH or burst frame component is added to the table and the tree
view. If the frame layout plot is open, you will see the new FCH or burst appear there
also. You can click on the buttons to add more data bursts, a midamble, or a gap.
c. To delete a particular frame component, click anywhere in the row of that item and then
click Delete Burst.
d. To change the order of the frame components, click anywhere in the row of that item
and use the up or down arrow to move it higher or lower in the table.
e. To edit a frame component, click on the item in the tree view on the left. For example,
clicking on a burst will display the Burst View shown in Figure 17 on page 32.
f. From the Burst View page, you can change the Data Type, Modulation Type, Coding
Type, Coding Rate Type, DIUC (Downlink Interval Usage Code) and OFDM Symbol
Length. Refer to Table 4, “Burst View Parameters,” on page 33 in this document for
more details on these settings.
g. Click on Frame in the tree view to go back to a view of the overall frame. Click on the
Check Parameters button above the downlink table to verify that the bursts that have
been configured do not exceed the length of the defined frame. A result message will be
shown in the status bar at the bottom of the window. The proper result is “Parameters
are fine.”