
User manual


The Binary file format selection provides the fastest storage performance and generates the smallest files on
the hard drive. Binary files can be subsequently converted to either Raw ADC values or to Amplitude
values using the Data Format Conversion utility provided with AcqirisLive.
Selecting the “Write files at end option” acquires all waveforms into memory first, before converting to the
selected format and writing the data to disk. This option allows for faster data capture times. Selecting the
“Show waveforms” allows the user to see the waveforms before writing them to disk.
When all parameters are selected, click OK, and then select Normal, Auto or Single acquisition mode.
When the waveforms are recorded a progress bar will appear to show the status of the acquisition and of
writing the data to disk. The Autostore function can be aborted from the progress bar.
Raw ADC values are the raw 16-bit ADC levels in ASCII format. The channel’s gain and offset are needed in order
to obtain the signal level in Volts. The required information to convert the Raw ADC values to voltage is included in
the header information of each Raw ADC ASCII file or in the .awh file accompanying the binary files. In order to
convert the Raw ADC values into Volts the following formula should be used.
V = vGain * data – vOffset
The Amplitudes [V] selection stores the waveforms as voltage samples in ASCII format. This data has already been
adjusted for gain and offset and can be directly read out as a voltage. However, it requires roughly twice as much
space as Raw ADC value data.
For the sequential acquisition mode, the segment time stamps are also stored when waveforms are saved using the
Autostore and Save Waveform functions.
Data stored in binary format with Autostore must be converted before it
can be imported into a data processing package or a spreadsheet (e.g.
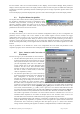
Excel). The Data Format Conversion option is found under the Store menu.
Select Data Format Conversion in order to bring up the following window.
The acquisition must be stopped in order to access this menu.
To convert the binary data, simply select the source folder where the data
is located, select the output format and click OK
.
All binary data files found in the source directory will be converted to the
desired format. If you are writing amplitudes with multiple segments,
formatting with segments in columns is limited to 200 segments.
4.6. Calibrate
The Calibrate item in the Options menu leads to a sub-menu where a particular type of calibration can be invoked. In
order to use this item the acquisition must be stopped; otherwise the Calibrate option is not selectable. The
possibilities are
Calibrate instruments - to perform a self-calibration on the digitizers, calibrating the gain, offset, trigger
level and the timing. Performing a calibration compensates for any drift in these properties, typically due to
component temperature variations.
Calibrate current combine configuration – to perform a calibration only at the current configuration in each
instrument.
Calibrate External Clock Timing – to do a calibration of the internal TDC in the Continuous External Clock
mode.
4.7. Combine channels
The Combine Channels function in the Options menu give the 10-bit digitizer user the control of how many
converters will be used for each channel. This allows the memory size and the sampling rate to be increased in
situations where not all of the input channels need to be acquired. Normally digitizer modules work with one
converter/channel. If two or more converters/channel are desired, the identities of the channels to be used have to be
chosen with the Active Channel control.
4.8. External 10 MHz Reference and External Clock
Either one of the External 10 MHz Reference or External Clock options can be selected in the Options Menu. The
external input threshold option, available in the options menu, must also be set appropriately. The 10 MHz Reference
can be activated at the I/O B output.
User Manual: Agilent Acqiris 10-bit Digitizers Page 35 of 43